New! DIY Project Planner. Plan smarter, skip the spreadsheets. Start Your Free Trial Today →

Smart DIY & Home Improvement Tips
Smart DIY & Home Improvement Tips
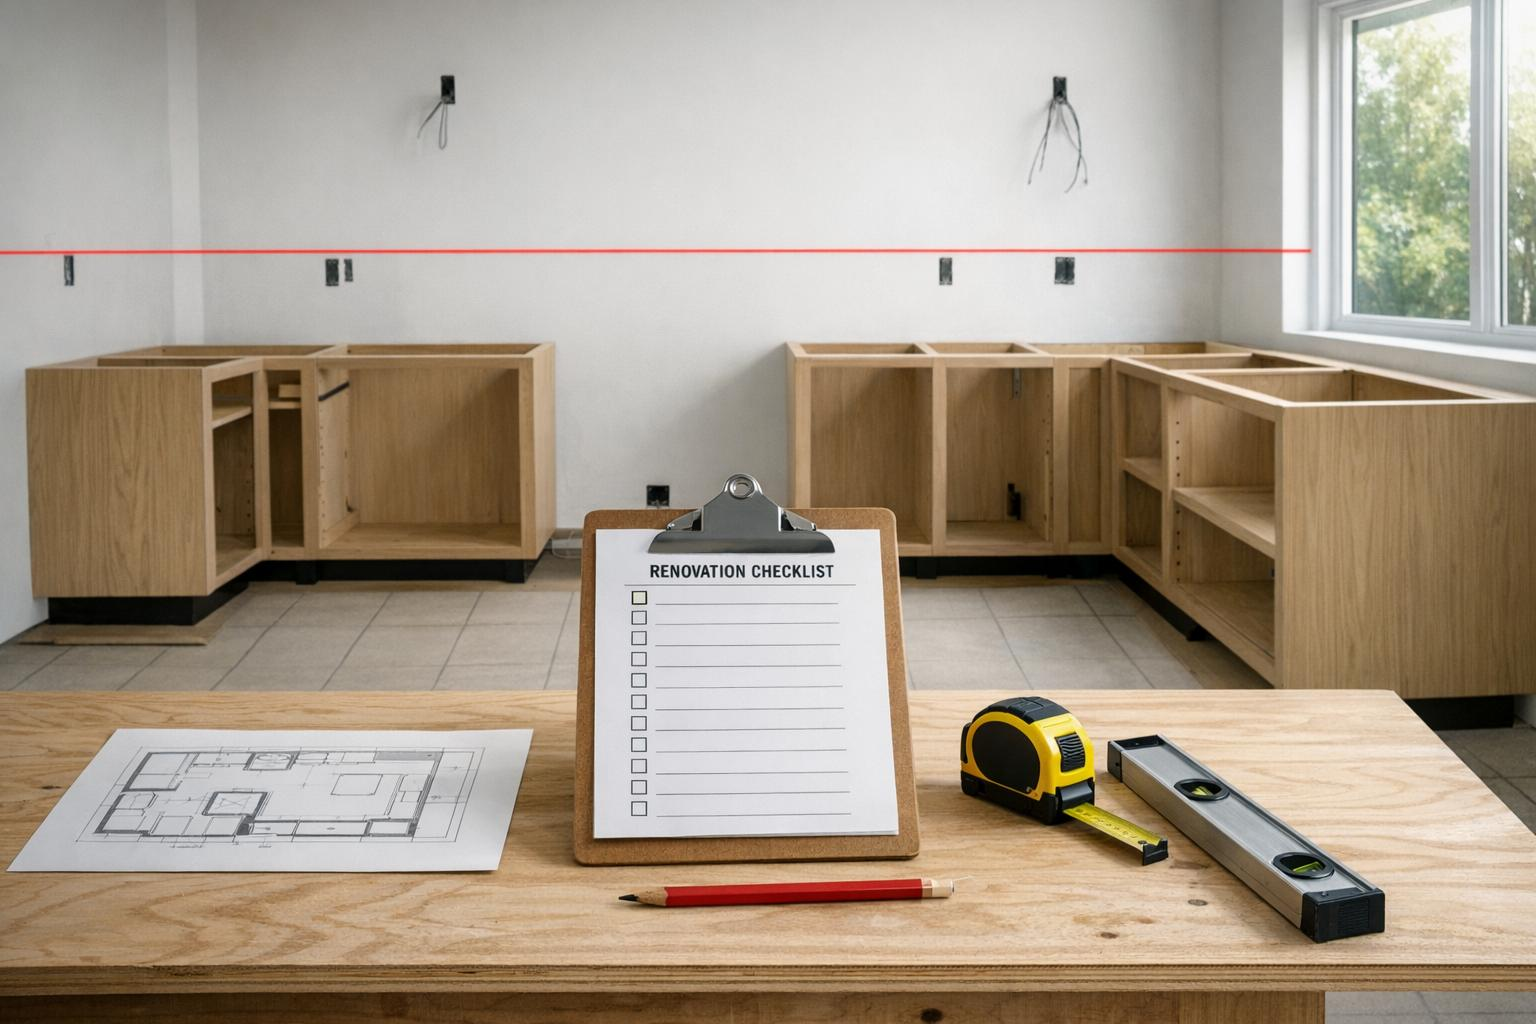
A step-by-step 15-point checklist to avoid budget overruns, delays, and costly mistakes during kitchen renovations.
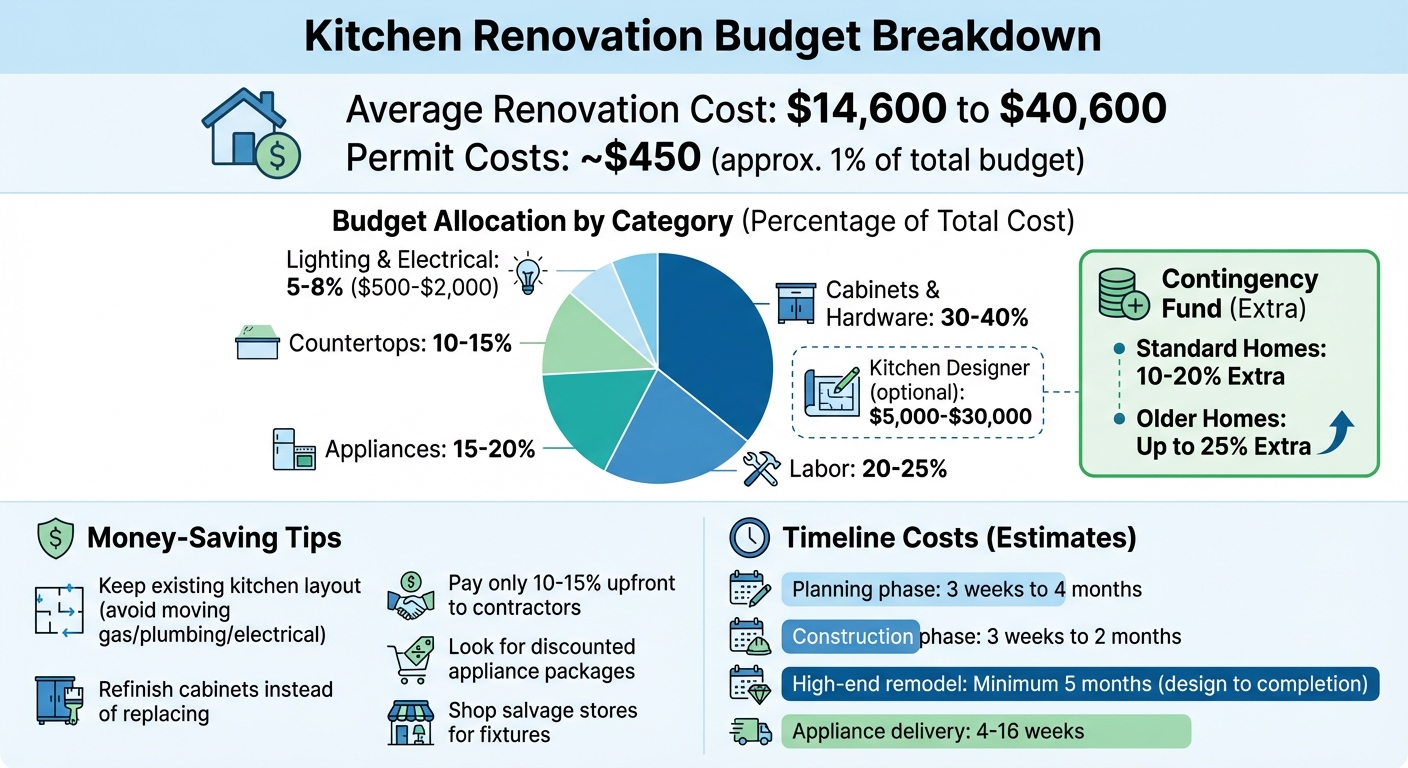
Renovating your kitchen can be a complex and costly project, with average costs ranging from $14,600 to $40,600. Without proper planning, you risk delays, budget overruns, and unexpected issues. This checklist simplifies the process into 15 key steps to help you avoid common pitfalls and keep your renovation on track.
By following this structured approach, you can minimize stress, avoid costly mistakes, and achieve a functional, durable kitchen that fits your needs.
Kitchen Renovation Budget Breakdown and Cost Distribution Guide
Start by identifying what’s not working in your current kitchen. Think about how your household uses the space – whether it’s primarily for cooking, a family gathering spot, or a hub for entertaining guests.
Consider moving beyond the traditional work triangle. According to a 2025 Kitchen Trends Report, nearly half of respondents prioritize kitchen layout, with many preferring multiple workstations over designs meant for just one cook.
“Kitchen designers have evolved beyond the traditional ‘triangle’ layout, which assumes one cook operating at a time. The modern kitchen has introduced workstations and prioritized workflow.”
Before diving into new cabinet designs, take stock of what you already own. Declutter by donating duplicate or unused items – this can save you money by reducing the need for extra storage space.
Once you’ve clarified your renovation goals, create a financial plan that aligns with your vision.
Expect cabinets and hardware to take up 30–40% of your budget, with labor accounting for 20–25%, appliances 15–20%, and countertops 10–15%.
You can save significantly by keeping your kitchen’s current layout. Moving gas lines, plumbing, or electrical connections can be expensive, so sticking to the existing footprint is a smart cost-saving strategy. If your cabinets are still in good condition, consider refinishing or repainting instead of replacing them.
Always include a contingency fund in your budget. Allocate an extra 10–20% – or even up to 25% for older homes – to cover unexpected issues.
“If you’re working with an older home, assume that something unexpected will arise – building in a contingency budget of 10 to 20 percent can save you stress when surprises pop up.”
- Kerrie Kelly, NKBA National Vice Chair
Get at least three detailed, itemized quotes from contractors to compare costs effectively. Avoid paying more than 10–15% of the total project cost upfront. To save even more, look for discounted appliance packages, salvage stores, or online deals for fixtures.
Once your budget is finalized, make sure you’ve addressed all the legal requirements before starting any work.
Renovation permits typically start at around $450, which is roughly 1% of your total project budget. You’ll usually need permits for structural changes, plumbing or gas line work, electrical updates, or new ventilation systems.
Check with your local building department before beginning demolition. If your renovation doesn’t involve moving pipes or wiring, you might not need permits. Cosmetic updates like painting, replacing tiles, or swapping cabinets in the same location typically don’t require permits either, but it’s always wise to verify this locally.
“Not obtaining the required permits can cause many problems, such as work stoppages, extra fees, replacing work already installed and complicating selling the home later.”
- Erik Listou and Louie Delaware, Co-founders, Living in Place Institute
Schedule inspections during the renovation process, especially while walls are open, so inspectors can check plumbing and electrical work before drywall goes up. Keep copies of all approved permits and inspection reports – they’ll be important if you decide to sell your home in the future. Additionally, if you plan to place a dumpster on a public street, check if a separate right-of-way permit is required.
Once you’ve set your goals and budget, it’s time to focus on fine-tuning the design and picking materials that will stand the test of time.
Arrange the sink, refrigerator, and cooktop to minimize walking distances, keeping the work triangle efficient. Each side of the triangle should measure between 4 and 9 feet, with the total distance not exceeding 26 feet. Walkways should be at least 36 inches wide, while work aisles should allow 42–48 inches of clearance. Plan for counter landings too – like 24 inches on one side of the sink, 18 inches on the other, 15 inches next to the refrigerator, and 12–15 inches around the cooktop. Make sure appliances like dishwashers, ovens, and refrigerators can open freely without obstruction.
For households with more than one cook, think about creating task-specific zones, such as a prep area, baking station, or coffee bar, to keep traffic flowing smoothly.
Start by ordering cabinets, as they often have the longest lead times. Choose materials based on your priorities: solid wood for strength, plywood for balance, or MDF for a smooth painted finish. For countertops, quartz is a great low-maintenance option, granite offers unique natural patterns (though it needs periodic sealing), and butcher block adds a warm, rustic vibe but requires regular care.
“High quality custom cabinetry, designed specifically for you, is almost as important as the floor plan. It is impossible to overestimate the value of beautiful custom cabinets by a good cabinet maker.”
- Jenni Leasia, Interior Designer
If you’re using custom stone or other specialized materials, keep in mind these can extend your timeline by several weeks. Double-check shipping times before finalizing your order. Also, confirm appliance measurements before ordering cabinets to avoid fitment problems. On average, a high-end kitchen remodel takes at least five months from design to completion. Hiring a kitchen designer, which can cost $5,000–$30,000, can help keep everything on track.
Take stock of your current kitchen storage and donate or discard duplicates to avoid wasting cabinet space. The National Kitchen & Bath Association suggests a minimum of 13 feet of countertop length, with uninterrupted prep areas of at least 3 feet, ideally next to a sink. To maximize storage, extend upper cabinets to the ceiling – this not only increases capacity but also eliminates dust-collecting gaps. Use every inch wisely with features like pull-out spice racks, appliance garages, toe-kick drawers, and drawers of varying depths. For smaller kitchens, consider half-depth cabinets to widen walkways and include space-saving solutions like hidden induction cooktops, pull-out cutting boards, or sink covers. Place landing areas next to the microwave and refrigerator for convenience when handling hot dishes or groceries.
A well-lit kitchen is both functional and inviting. Layer three types of lighting: ambient lighting (like recessed ceiling lights) for overall illumination, task lighting (such as under-cabinet LED strips) for workspaces, and accent lighting (like in-cabinet or toe-kick fixtures) to highlight design details. Plan to spend $500–$2,000 on lighting and electrical work, which typically makes up 5–8% of your renovation budget.
“Using a layered approach to create a warm atmosphere while having task lighting that’s bright enough to see what you’re chopping or sautéeing is crucial.”
- Carley Knobloch, Personal Tech Expert
Install dimmers for overhead lights to easily switch between task lighting and softer, ambient settings. Motion-sensor lights in pantries can be a game-changer, automatically turning on when you open the door. For safety, place outlets at least 1 foot away from the sink and ensure all countertop outlets have GFCI protection.
Ventilation is equally important to remove heat, steam, and cooking odors, which can damage cabinets and walls over time. Choose range hoods, downdraft systems, or microwave-ventilation combos with an exhaust rate of at least 150 cubic feet per minute (CFM). Maintain a clearance of at least 30 inches between the cooking surface and any unprotected combustible surface above it for fire safety.
These thoughtful design choices set the stage for a functional and efficient kitchen renovation.
Before you start tearing down cabinets and ripping out countertops, taking a few thoughtful steps can save you from headaches and unexpected expenses.
Find a spot far from the construction chaos to serve as your makeshift kitchen – think dining room, basement, laundry room, or even the garage. Relocate your refrigerator to an easy-to-access area like the garage, or use a mini-fridge for daily essentials. A folding table can hold small appliances like a toaster or microwave to help with basic meal prep.
For washing dishes, an alternative sink works well. Pair it with a drying rack, and stock up on paper plates and plastic utensils to cut down on dishwashing. If you’re using a non-kitchen sink, scrape off food residue to avoid clogs.
“A kitchen renovation can take several months… Preparing this nook can save you hundreds of dollars because you won’t have to eat out as often.”
- Cathy Cherry, Architect and Designer, Purple Cherry Architecture
Another smart move? Cook and freeze meals ahead of time that can be easily reheated in a microwave or countertop oven. Pack a small kit of essentials – oven mitts, a can opener, a chef’s knife, and some basic seasonings – to make your temporary setup more functional.
Just like a detailed budget helps avoid financial surprises, documenting your current kitchen can help you sidestep logistical hiccups. Once your temporary kitchen is set up, take the time to assess and record the current space.
Snap photos from different angles and create a floor plan that highlights the locations of electrical outlets, plumbing lines, and gas valves. This step can reveal hidden issues, such as outdated wiring, plumbing that needs rerouting, or even asbestos in older homes.
Make a “frustration list” of everything that bugs you about your current kitchen – poor layout, lack of storage, or sticky cabinet doors. This list will help ensure your new design addresses those pain points. While you’re at it, inventory your kitchenware and consider donating duplicates. This way, your new storage solutions will be tailored to what you actually use.
With your kitchen documented, it’s time to map out a clear timeline to keep the renovation on track. Expect to spend 3 weeks to 4 months on planning, permits, and sourcing materials before construction even begins. Once the work starts, here’s a general breakdown:
Order cabinets and appliances as soon as your design is finalized – cabinets often have the longest lead times, and appliances can take 4 to 16 weeks for delivery. Keep in mind that permits alone might take anywhere from two weeks to several months to get approved. Once construction begins, most kitchen renovations are completed within 3 weeks to 2 months.
To minimize stress, avoid timing the project’s completion around major holidays. Also, give your neighbors a heads-up about the timeline and any potential noise – it’s a small courtesy that goes a long way.
Once the construction phase kicks off, it’s important to stay on top of things. Keep a close eye on deliveries and perform quality checks to ensure everything is progressing as planned. When items arrive, inspect them carefully for any dents, scratches, or incorrect dimensions. For mechanical components like cabinet doors and drawers, test them to confirm they open and close smoothly.
Double-check that new appliances can fit through doorways and into their assigned spaces. Accurate measurements are critical here – catching issues early can save a lot of headaches. For example, if a gas range arrives but your home is set up for electric hookups, you’ll need to address that immediately. Store all delivered items in a specific, safe area until they’re ready to be installed.
“Have the cabinet layout and appliance specs on hand during installation to avoid misalignments, and confirm that everything fits as intended.” – Standard Supply & Lumber
Once you’ve confirmed the materials are correct, it’s time to shift your attention to managing debris and ensuring utility safety.
After verifying the quality of your materials, make sure you have a plan to handle debris. Arrange for a dumpster rental or hire a professional haul-away service before demolition starts. This will help prevent waste from piling up and slowing down the project. Also, before demolition begins, turn off water, gas, and electricity at the main valves or breaker box. Be sure to properly cap off any lines for safety.
Before wrapping up the project, do a walkthrough with your contractor to create a “punch list” of any unfinished tasks or minor fixes. Take notes and photos of any issues you spot. Test every connection thoroughly – run the dishwasher, check all burners, and ensure GFCI outlets near water sources are functioning properly. Don’t forget to schedule the necessary permit inspections to confirm everything complies with local building codes. Avoid sealing up walls or installing cabinetry until the inspectors give their approval. And for added peace of mind, consider installing leak sensors behind appliances before pushing them into place. These can help catch hidden water line problems early.
Renovating your kitchen is no small undertaking, which is why having a clear, organized checklist is so important. By following a step-by-step plan – from setting clear goals and obtaining permits to inspecting materials and conducting a final walkthrough – you can sidestep the common pitfalls that lead to budget overruns and project delays.
A well-thought-out checklist helps you stay on track financially and logistically. For instance, planning ahead can save you from unexpected headaches, such as the need for a temporary kitchen setup to cut down on takeout expenses or setting aside a 10% to 20% contingency in your budget for surprises like hidden water damage.
Final inspections and hands-on checks are essential to ensure everything meets your expectations. By sticking to these carefully outlined steps, you’ll not only achieve the kitchen design you’ve envisioned but also create a space that’s built to last.
Use this checklist as a guide throughout your renovation journey. It’s an investment in a practical, beautiful kitchen that will serve you well for years to come.
Saving money on a kitchen renovation starts with thoughtful planning and a clear budget. Begin by setting a realistic spending limit and adding a 10–20% cushion for any surprises along the way. Prioritize your funds for areas that make the biggest visual and functional impact, like cabinets, countertops, and appliances, while scaling back on less essential upgrades.
To keep costs down, take on DIY-friendly projects such as painting walls, updating hardware, or handling small demolition tasks. For more complex jobs, like electrical or plumbing work, it’s best to hire professionals to ensure everything is done safely and correctly. Another way to save is by reusing or repurposing materials – consider refinishing or repainting your cabinets instead of replacing them entirely. Also, keep an eye out for sales or discounts on appliances, fixtures, and accessories.
When it comes to materials, opt for cost-effective options that still deliver on style. For instance, laminate countertops and vinyl flooring can give your kitchen a polished look without breaking the bank. With a little creativity and careful planning, you can transform your kitchen without overspending.
To stay on track with your kitchen renovation, it’s crucial to start with a clear and detailed plan. Break the project into phases like design, permits, demolition, installation, and finishing touches. Set realistic timelines for each step, and don’t forget to build in a 1–2 week buffer for surprises like inspection delays or hidden issues.
Work with a licensed contractor who can provide a written schedule and commit to regular updates. Order essential materials – such as cabinets, countertops, appliances, and fixtures – well ahead of time to sidestep delivery delays. Keeping a simple checklist to monitor material arrivals and project milestones can help you spot and address potential problems early.
Make it a point to schedule weekly walk-throughs with your contractor to review progress and tackle any delays head-on. By planning carefully, securing permits and materials early, and staying actively involved, you can keep your kitchen renovation on schedule and ensure everything wraps up as planned.
During a kitchen renovation, having a temporary setup for cooking and food storage can make life much easier. Start by designating a small area with a table, countertop, or rolling cart where you can keep essentials like a microwave, portable cooktop, and mini-fridge. These basics will cover simple meal prep and storage needs. Keep a few key items within reach, such as pots, pans, utensils, a cutting board, and a set of everyday dishes.
For cleaning, make sure you have dish soap, a sponge, and a small trash bin close by. To improve visibility, add portable lighting like a clamp-on lamp or battery-powered LED strips. If you’re short on storage, a rolling shelf or storage cart can hold pantry staples and extra dishes. Don’t forget about ventilation – use a portable fan or open a window to keep cooking odors and steam under control. With these essentials, you’ll stay organized and comfortable while waiting for your new kitchen to be completed.