New! DIY Project Planner. Plan smarter, skip the spreadsheets. Start Your Free Trial Today →

Smart DIY & Home Improvement Tips
Smart DIY & Home Improvement Tips
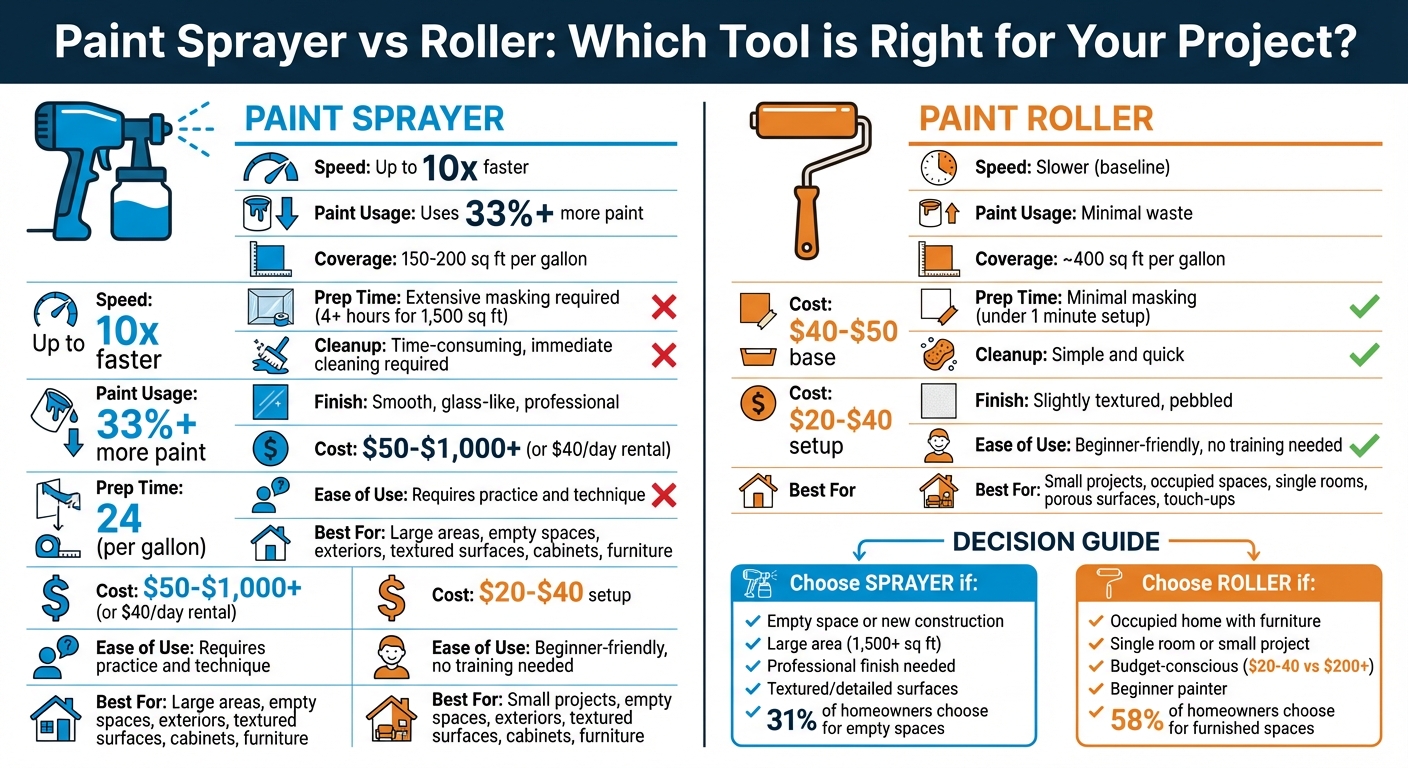
Compare sprayers and rollers by speed, paint use, prep, cleanup, and finish to choose the right tool for your project's size, surface, and skill level.
Choosing between a paint sprayer and a roller depends on your project’s size, surface type, and your experience level. Here’s the breakdown:
| Feature | Paint Sprayer | Paint Roller |
|---|---|---|
| Speed | Up to 10x faster | Slower |
| Paint Usage | Uses 33%+ more paint | Minimal waste |
| Prep Time | Extensive masking required | Minimal masking |
| Cleanup | More time-consuming | Simple and quick |
| Finish | Smooth, even coat | Slightly textured |
| Cost | $50–$1,000+ (or $40/day rental) | $20–$40 setup |
| Ease of Use | Requires practice | Beginner-friendly |
| Best For | Large, empty, or textured spaces | Small, occupied, or porous areas |
Sprayers excel in speed and finish quality but demand more effort in prep and cleanup. Rollers are slower but easier, cheaper, and less wasteful. Choose based on your project’s needs, budget, and skill level.
Paint Sprayer vs Roller Comparison Chart: Speed, Cost, and Best Uses
When it comes to applying paint quickly, sprayers leave rollers in the dust – delivering paint up to 10 times faster. For example, testers using the Titan ControlMax 1900 Pro managed to paint an 11×11×12-foot wooden shed in under an hour without needing to thin the paint. In another test, a stationary Titan ControlMax airless sprayer coated a large chest of drawers with a smooth, professional finish in just 10 minutes.
“A sprayer can do in minutes what a paint roller can do in hours.” – admin, Paintzen
This speed advantage makes sprayers ideal for large-scale projects, such as house exteriors, fences, or empty interior spaces. That said, the time saved during painting can sometimes be offset by the longer preparation and cleanup required.
One downside to sprayers is the extensive masking needed to prevent overspray, which can make prep work three times longer than when using rollers.
“Generally, it can take at least three times as much time to mask when you’re using a sprayer versus a brush or roller.” – Don Easton, Professional Painter
Rollers, on the other hand, require minimal prep – just drop cloths, some tape, and basic cleanup of brushes or roller covers. Sprayers, however, demand immediate and thorough cleaning of the pump, hoses, and gun to prevent dried paint from clogging the equipment. This makes sprayers less forgiving if you need to pause mid-project. Rollers are far simpler in this regard; you can pause by covering the tools, making them more convenient for smaller tasks or projects in occupied spaces.
For smaller jobs, the extra prep and cleanup time with sprayers can cancel out their faster application speed. In such cases, the total time for both methods often ends up being fairly similar. This balance between speed, prep, and cleanup is a crucial factor when deciding which tool is better suited for your project.
Sprayers tend to use more paint than rollers – often about 33% more due to overspray and misting. In less controlled settings, this can climb to 2–3 times the amount of paint compared to rollers. High-pressure atomization creates a fine mist that can drift away from the intended surface. Plus, some paint gets trapped in the sprayer’s hose and internal parts, resulting in waste.
On the other hand, rollers are much more efficient, applying paint directly to the surface with minimal waste. For example, a gallon of paint can cover roughly 400 square feet when applied with a roller, while spraying typically covers only 150–200 square feet per gallon. To cut down on waste when using a sprayer, you can adjust the pressure to the lowest effective setting, use the right tip size for the paint (e.g., .013–.015 for oil-based and .015–.019 for latex), and maintain a steady distance and angle from the surface.
These differences in efficiency directly impact the overall cost of a project, as discussed below.
The cost of equipment varies significantly between rollers and sprayers. A basic roller setup – including a frame, covers, and a tray – generally costs between $20 and $40. Entry-level HVLP sprayers range from $50 to $300, while airless models can cost anywhere from $200 to $1,000. For those who don’t want to invest in a sprayer, professional-grade models can usually be rented for about $40 per day.
Rollers do have recurring costs, as the covers are often single-use and need to be replaced after each project. While sprayers don’t have as many recurring costs for tools, they do require more paint per job and need specialized cleaning solvents to keep the equipment in good working condition. The higher upfront cost of a sprayer might make sense for those tackling multiple large-scale projects, where the time saved offsets the additional material expenses.
Sprayers shine when it comes to tackling textured or uneven surfaces like stucco, brick, and popcorn ceilings. By atomizing the paint, sprayers can easily reach crevices and intricate details, making them a go-to choice for masonry work, crown molding, and other complex textures.
Rollers, on the other hand, can handle textured surfaces as long as you select the right nap length. However, they tend to require more time and effort on highly textured areas. For delicate surfaces, such as popcorn ceilings, rollers pose a risk of damage, making sprayers the safer and more efficient option.
When it comes to smooth surfaces like interior walls, metal, or plaster, both tools can achieve good results, though they each have their strengths. Sprayers provide an even coat with minimal texture, while rollers – especially with a short nap (1/8″ to 1/4″) – are a trusted choice for smooth finishes on walls and ceilings.
Understanding these differences helps set the stage for evaluating the finish quality each tool offers.
Sprayers are known for delivering a smooth, “glass-like” finish without leaving behind tool marks. Doug Curving, a Sales and Service Representative at Valspar, notes:
“Done correctly, a sprayer will give you a nicer finish”.
Rollers, however, leave a slight pebbled texture, which can help hide surface imperfections while maintaining consistent color coverage. Rachel Otto, a Paint Specialist at Fleury Lumber, shares this advice:
“If you apply too much pressure to the paint roller, you might see some uneven application lines”.
Interestingly, many professional painters use a combination of both methods in a process called back-rolling. This involves spraying paint onto the surface and immediately following up with a roller. The roller helps fuse the paint droplets together, creating a more durable and uniform finish – especially on porous surfaces.
The amount of prep work needed for each painting tool can have a big impact on your project’s timeline. Sprayers, for instance, demand extensive masking to protect everything you don’t want painted – windows, floors, baseboards, electrical boxes, furniture – you name it.
Lee Wallender, a Home Improvement Expert at The Spruce, emphasizes:
“Whatever you neglect to mask when spraying will get painted, like it or not”.
Masking a 1,500-square-foot area can easily take 4 hours or more, especially for detailed jobs. This process often generates 2 to 3 large garbage bags of waste from masking materials, most of which cannot be reused. In stark contrast, rollers require far less prep work.
For rollers, preparation is minimal – usually just laying down drop cloths and applying painter’s tape to edges and corners. You can often set up a roller in under a minute. This simplicity makes rollers the go-to choice for about 58% of homeowners who paint spaces that are already furnished and in use. Norse Painting highlights this advantage:
“With a roller, you have more control over where the paint goes, making it the better choice for indoor painting projects, especially in occupied homes”.
Sprayers, on the other hand, shine in empty spaces like new builds or vacant remodels, where masking is limited to plumbing stub-outs and windows. But in furnished homes, the time and effort needed to wrap everything in plastic make rollers the more practical and efficient option. Ultimately, the masking requirements are a key factor when weighing the speed of sprayers against the straightforward setup of rollers.
Rollers are hands-down the easiest option for beginners. They require no prior experience or special training – just grab one, and you’re ready to go. Most people can start painting with a roller in just minutes. Plus, a complete roller setup is budget-friendly, costing between $20 and $40. Need to pause mid-project? Simply wrap the roller in a plastic bag to keep the paint from drying out.
Paint sprayers, on the other hand, are much trickier to master. Beginners often struggle with maintaining the right distance from the surface. Too close, and you end up with a heavy, uneven coat. Too far, and the paint may dry mid-air, leaving a patchy finish. Consistency is another challenge: moving at an even speed and overlapping passes correctly is essential to avoid drips, runs, or blotches. Home improvement expert Lee Wallender cautions:
“If you have never used a paint sprayer before, now may not be the best time to learn”.
To get the hang of it, practice on scrap materials like wood or cardboard. Entry-level HVLP sprayers (priced around $42 to $50) are a good starting point for beginners, as they’re easier to manage compared to professional-grade airless sprayers. Those advanced models, which cost between $200 and $1,000, operate at pressures as high as 3,000 psi, making them more challenging to control.
While rollers win on ease of use, sprayers require patience and practice to achieve precision.
Rollers are forgiving and easy to manage. They naturally absorb excess paint, reducing the risk of drips or bubbles – common issues for inexperienced sprayer users. If you make a mistake, you can simply roll over it while the paint is still wet. The main technique to keep in mind? Don’t press too hard, as this can leave uneven lines in your application.
Sprayers, however, demand a steady hand and precise technique. You need to keep the spray head level, maintain a consistent distance from the surface, and move at an even pace to avoid sputtering or uneven coverage. There’s also a safety aspect to consider: high-pressure airless sprayers can cause serious injuries if misused. They can inject paint under the skin at dangerous speeds, so proper handling is critical. As Doug Curving, a Valspar sales representative, points out:
“Done correctly, a sprayer will give you a nicer finish”.
When used properly, sprayers can deliver a flawless, factory-like finish. However, they leave little room for error. Rollers, while leaving a slightly textured, pebbled look, are far easier to control and are the better choice for most DIY projects.
Sprayers shine when you’re starting with a clean slate. They’re perfect for new builds, early-stage remodels, or exterior projects like siding and fences where there’s little risk of overspray landing on nearby objects. In fact, about 31% of homeowners use sprayers for painting empty spaces – an ideal scenario for this tool.
The smooth, professional finish sprayers deliver makes them a top choice for cabinets, furniture, shutters, and detailed trim work like crown molding. They’re also great for tackling hard-to-reach spots, such as deep crevices in masonry, brickwork, or intricate designs that rollers can’t handle. That said, outdoor spraying comes with a caveat: even a light breeze can carry paint mist onto cars, landscaping, or neighboring properties, so calm weather is essential.
For large-scale projects, sprayers offer unmatched speed once everything is prepped and masked. However, timing is key. If you can’t finish the job in one session, rollers might be a better option – paint left in a sprayer can dry and cause permanent clogs.
When minimal prep and flexibility are your priorities, switching to rollers may be the smarter move.
Rollers are the practical choice for occupied homes. They require much less masking – just tape the edges, throw down a drop cloth, and you’re good to go. Plus, they create virtually no airborne mess.
They’re ideal for single rooms, accent walls, or smaller to mid-sized projects where the time saved with a sprayer would be offset by the extra work of setup and cleanup. Rollers also excel on porous surfaces like wood siding, stucco, or fiber cement. The physical pressure of rolling pushes paint into the texture, ensuring strong adhesion.
Rollers are also perfect for touch-ups, small repaints, and projects done in phases. You can simply wrap the roller in plastic during breaks, avoiding the hassle of cleaning or the risk of clogs. And with a complete setup costing only $20 to $40, rollers keep both your expenses and paint waste in check.
When deciding between a sprayer and a roller, it all comes down to the specific needs of your project.
Sprayers deliver a smooth, professional finish over large areas but come with trade-offs: they require extensive masking, use about 33% more paint, and involve a more thorough cleanup process. On the other hand, rollers, which can cost as little as $20 to $50, waste minimal paint and need only basic edge taping.
“Paint spraying is fast and capable of covering rough textures that rollers can’t touch, yet the preparation work is extensive. Paint rollers have less prep work and the tools are less expensive, but it’s very labor-intensive.” – Lee Wallender, The Spruce
This quote captures the essence of the decision – balancing speed and preparation with cost and effort.
Sprayers are ideal for empty interiors, exterior siding, or when you’re aiming for a factory-like finish. Rollers, on the other hand, are perfect for single rooms, budget-friendly projects, or spaces filled with furniture and flooring. For textured surfaces like stucco, you might want to combine methods: spray for speed and then back-roll to push the paint into the surface for better adhesion.
Ultimately, the best choice depends on your timeline, budget, and workspace. Pick the tool that allows you to focus on achieving great results, not on fixing mistakes.
When deciding between a paint sprayer and a roller, it all boils down to the size of your project, the type of surface you’re working on, and how comfortable you are with the tools.
Paint sprayers are perfect for tackling large areas, textured surfaces, or outdoor projects. They’re especially handy when you need quick, smooth, and even coverage. That said, they do require extra preparation, like masking off areas, and the cleanup can be a bit more involved. If you’re already familiar with using equipment like this, a sprayer can be a great choice.
Rollers, by contrast, are simpler, more affordable, and easier to handle – ideal for smaller-scale projects or when precision is key. They use less paint, create less mess, and are much more beginner-friendly. For painting a single room or interior walls, a roller is often the way to go.
When making your choice, think about the project’s size, the surface you’re painting, your budget, and how comfortable you feel with tools. Sprayers shine when speed and coverage are priorities, while rollers are better for precision and ease in smaller, more straightforward tasks.
When comparing costs, the difference largely comes down to initial investment and paint consumption. Paint sprayers tend to be pricier, with rental or purchase costs running into a few hundred dollars. Plus, they use about 25–33% more paint due to overspray, which can bump up your total project expenses. This makes sprayers less cost-effective for smaller jobs.
In contrast, rollers are a budget-friendly option, typically priced under $20. They also require less paint, making them an economical choice for most DIY projects. If you’re tackling a smaller area or aiming to save money, rollers are the way to go.
For achieving a clean and polished look on textured surfaces, paint sprayers often outperform rollers. They excel at delivering consistent, even coverage across rough or uneven textures – something that can be tricky with a roller. Sprayers are particularly handy for detailed or heavily textured areas, making it easier to achieve a smooth finish in less time.
That said, using a sprayer comes with a bit of a learning curve. It requires more preparation and practice to master the setup and technique. But once you’re comfortable with it, a sprayer can provide a much more refined finish than a roller on textured surfaces.