New! DIY Project Planner. Plan smarter, skip the spreadsheets. Start Your Free Trial Today →

Smart DIY & Home Improvement Tips
Smart DIY & Home Improvement Tips
Six easy steps to stop a dripping faucet: shut off water, inspect parts, replace washers/O-rings or cartridges, reassemble and test to save water and money.
Fixing a leaky faucet is easier than you think and can save you hundreds of dollars in plumbing costs. A single dripping faucet can waste over 4,000 gallons of water annually, adding unnecessary expenses to your water and heating bills. Most leaks are caused by worn-out parts like O-rings, washers, or cartridges, which are inexpensive and easy to replace. Here’s a quick breakdown of what to do:
With basic tools and less than $20 in parts, you can fix most leaks in under an hour. Don’t ignore that drip – small leaks can lead to bigger problems like mold or corrosion. Follow these steps to stop the waste and save money.
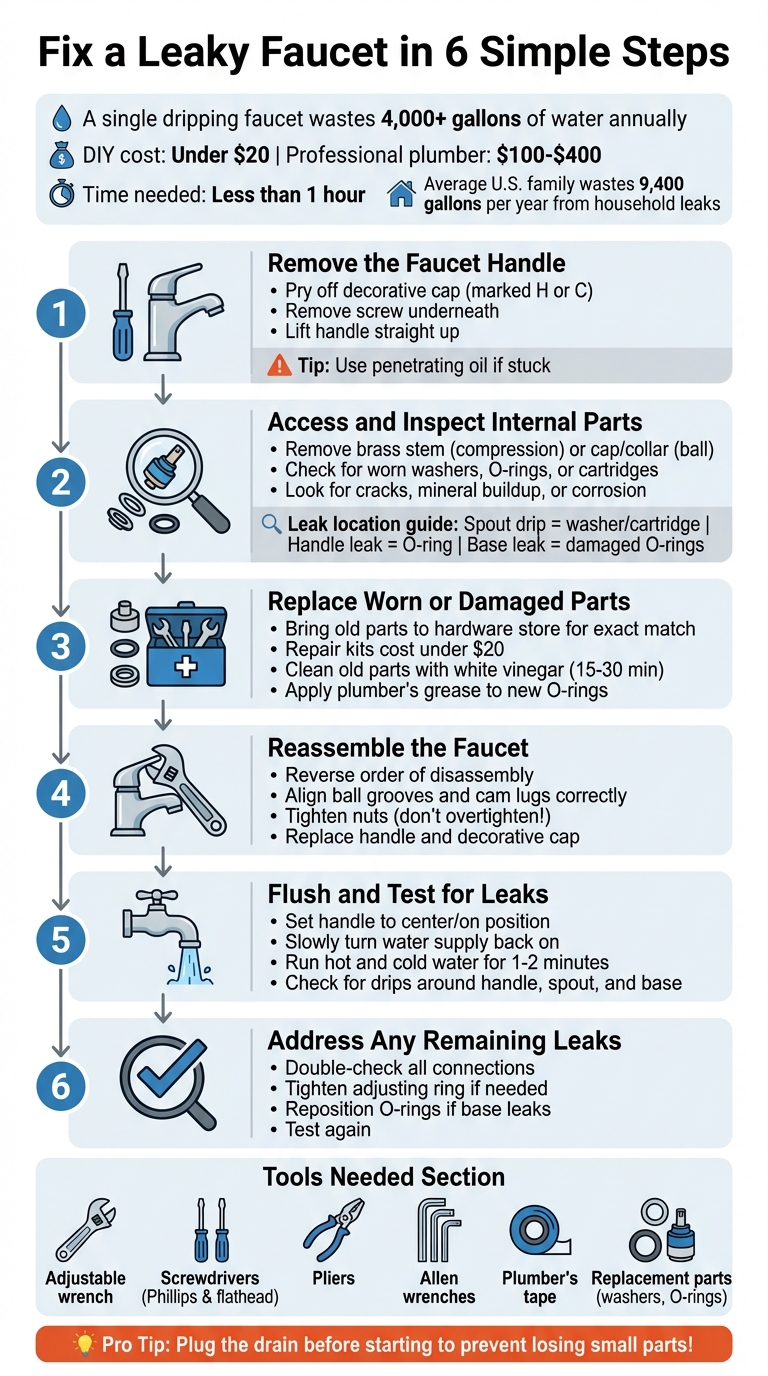
6-Step Guide to Fixing a Leaky Faucet at Home
Gathering the right tools and parts beforehand can save you from making multiple trips to the store. A well-prepared toolkit ensures a smoother repair process.
Start with the essentials. An adjustable wrench is a must for loosening nuts and bolts, while both Phillips and flat-head screwdrivers will cover the screws you’re likely to encounter. Slip-joint or needle-nose pliers are great for gripping small parts, and a set of small Allen wrenches (hex keys) is often necessary for removing faucet handles, especially on newer models.
For those tricky spots under the sink, a basin wrench is invaluable for reaching mounting nuts in tight spaces. If you’re working with ball-type faucets, you might need a spanner wrench, which is often included in specific repair kits. To protect chrome finishes, wrap masking tape around the jaws of your wrench.
The parts you’ll need depend on the type of faucet you’re repairing. For compression faucets (usually the two-handle type), you’ll likely need rubber seat washers and O-rings. Ball faucets (single-handle models that rotate in all directions) often require springs, rubber seats, and O-rings – or even a full ball cam assembly. A pre-packaged repair kit for these, costing around $20, can be a convenient option. Cartridge faucets typically need a new cartridge and O-rings, while ceramic-disk faucets may require a replacement disk cylinder or neoprene seals.
“The hardest step to fix a leaky faucet or a leaking sink sprayer is usually finding the right replacement parts.” – Family Handyman
Since these parts aren’t universal, it’s a good idea to bring the worn-out part with you to the hardware store to ensure a perfect match. Knowing your faucet’s brand and model number can also help you find the right cartridge or valve.
Beyond tools and replacement parts, a few additional supplies can make the job easier. Plumber’s tape (Teflon tape) is essential for creating watertight seals on threaded connections, and plumber’s grease (or petroleum jelly) is useful for lubricating O-rings and threads. A rag is handy for blocking the drain, and a small container will help you keep screws and parts organized.
Distilled white vinegar and an old toothbrush are great for cleaning mineral deposits from valve seats and internal components. Finally, place a bucket under the sink to catch any water left in the supply lines when you disconnect them.
Having the right tools and replacement parts is only half the battle. A little preparation can make the repair process smoother, prevent water damage, and ensure you don’t lose any small components along the way.
Start by locating the hot and cold water supply lines under your sink. You’ll find shut-off valves on each line – turn these clockwise until they’re fully closed. If the valves are hard to turn due to rust or if they’re missing altogether, you may need to shut off your home’s main water supply instead.
“No, every sink has its own shutoff valve that you can use. It should be under the sink. You just need to turn the water supply to the sink off.” – David Balkan, Professional Plumber & CEO of Balkan Sewer & Water Main
Once the valves are closed, test the faucet by turning on both handles. If no water comes out, you’ve successfully shut off the supply. Leave the handles in the “on” position to drain any remaining water and relieve pipe pressure. Now, it’s time to prep your workspace.
With the water supply turned off, plug the sink drain using a stopper or a rag. This simple step ensures no small parts accidentally fall into the pipes. Lay a towel in the sink to catch drips and protect the surface from scratches. Place a bucket under the supply lines to catch any leftover water, and keep screws or other small items organized – an egg carton works great for this. These small steps save time and frustration when it’s time to reassemble everything.
Once you’ve prepped your workspace and turned off the water supply, it’s time to dive into the repair process. These six steps cover most faucet styles, including compression, ball, and cartridge designs. Take your time – rushing can lead to stripped screws or misplaced parts.
Begin by checking for decorative caps on the handle, often marked with “H” or “C” for hot and cold. Use a flathead screwdriver to gently pry off the cap without scratching the surface. Beneath it, you’ll find a screw – remove it with a Phillips or flathead screwdriver. For some newer faucets, you might encounter a hex (Allen) set screw located on the side or back of the handle.
If the screw is stuck, apply a bit of penetrating oil like WD-40 and let it sit for a few minutes before trying again. Avoid hitting the handle to loosen it, as this can damage internal parts. For handles without screws, carefully pry along the seam to remove them.
“Nothing will ruin your day faster than watching a screw or washer you need slide down the drain when you accidentally drop it.”
– Dave Jones, Master Plumber, Roto-Rooter Plumbing & Water Cleanup
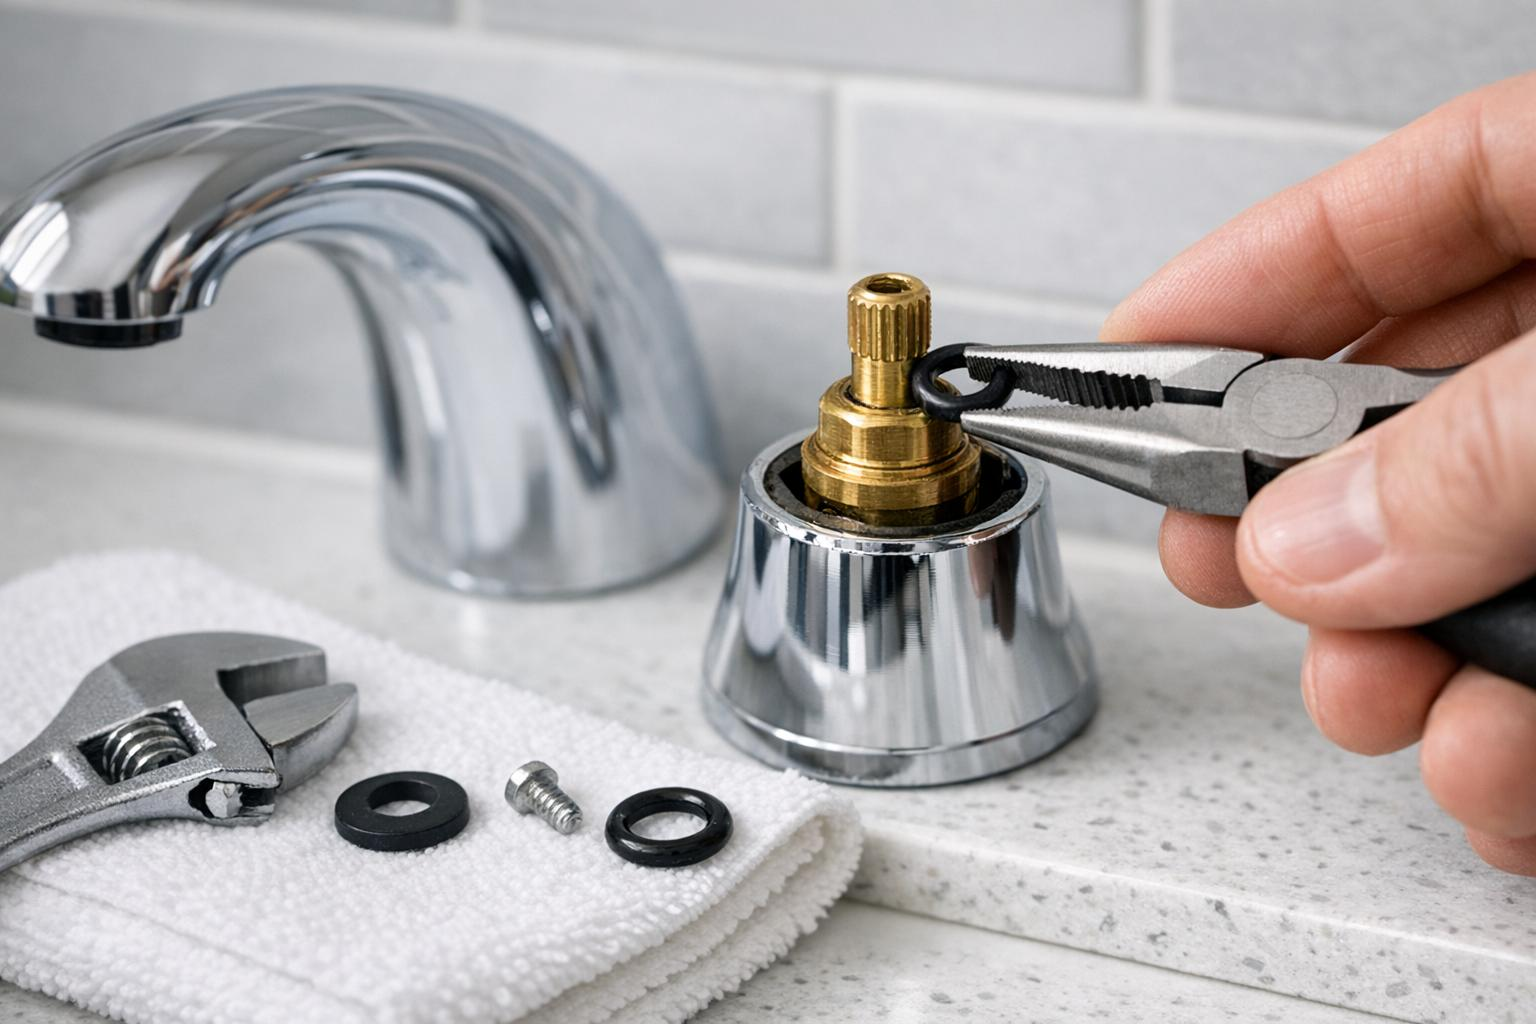
Once the handle is off, lift it straight up and set it aside. If you’re working on a compression faucet, you may also need to remove the packing nut underneath with a wrench. To protect the finish, wrap the wrench jaws in a cloth. Lay out the removed parts in the order you took them off – this will make reassembly much easier.
With the handle removed, you’ll see the faucet’s internal mechanism. For compression faucets, use an adjustable wrench to unscrew the brass stem. In ball faucets, remove the cap and collar to access the cam, ball, and spring assembly. Cartridge faucets will have a retaining clip or nut securing the cartridge in place.
Take a close look at these components. Washers and O-rings should be smooth and free of cracks or wear. If they appear flattened, frayed, or damaged, they’ll need replacing. Cartridges might show cracks or mineral buildup, while rotary balls in ball faucets can wear down over time. Also, check the valve seat inside the faucet body for corrosion or scale buildup.
The location of the leak can help pinpoint the issue:
Once you’ve identified the problem parts, replace them with exact matches. Bring the old components to a hardware store to ensure you get the right replacements, as faucet parts aren’t one-size-fits-all. Repair kits, often costing under $20, typically include washers, O-rings, springs, and seats.
Before installing new parts, soak the old ones in white vinegar for 15–30 minutes to remove mineral deposits – sometimes a good cleaning is all they need. If the valve seat is corroded, use a seat wrench to remove and replace it.
Apply a thin layer of plumber’s grease or petroleum jelly to new O-rings and washers to ensure a proper seal. For compression faucets, attach the new washer to the stem using the brass screw. In ball faucets, place new springs and rubber seats into the valve body, then align the rotary ball correctly. Cartridge replacements should snap into place in their designated orientation.
Now, put everything back together in reverse order. For ball faucets, ensure the ball’s groove aligns with the pin in the socket, and match the cam’s lug with the valve body’s notch. Cartridges should click securely into position.
When tightening nuts and caps, use a wrench but avoid overtightening – too much force can damage new washers or crack the faucet housing. Once everything is in place, screw the handle back on, replace the decorative cap, and get ready to test your work.
Set the faucet handle to the center (or “on”) position to allow trapped air to escape. Slowly turn the water supply valves back on – opening them too quickly can damage the new seals. You may hear some sputtering as air clears from the lines.
Run both hot and cold water for 1–2 minutes to flush out any debris or loosened mineral deposits. While the water runs, check for drips around the handle, spout, and base.
If you notice any minor leaks after reassembling the faucet, double-check all connections. For ball faucets, use a spanner tool to slightly tighten the adjusting ring if there’s a drip around the handle. If a compression faucet still drips from the spout, the valve seat might be too corroded to seal properly, even with a new washer.
Inspect all connections one last time. If water leaks from the base, it’s likely that an O-ring wasn’t seated correctly. In that case, turn off the water, disassemble the relevant section, reposition the O-ring, and test again.
Fixing a leaky faucet isn’t just a quick and easy DIY project – it’s also a smart way to save money and conserve water. By shutting off the water supply, identifying your faucet type, and swapping out worn washers, O-rings, or cartridges, you can eliminate that pesky drip in under an hour. Best of all, it’ll cost you less than $20 in materials. Compare that to hiring a plumber, which can run anywhere from $100 to $400 per visit. Tackling this yourself is a no-brainer.
The impact of household leaks is bigger than many homeowners realize. The average U.S. family wastes around 9,400 gallons of water every year due to leaks. Nationwide, that adds up to nearly a trillion gallons of wasted water annually. And if it’s hot water leaking, you’re also paying for unnecessary heating costs.
Beyond the immediate fix, keeping up with regular faucet maintenance can prevent more serious (and expensive) problems later. Replace washers every year or two, and clean aerators occasionally with white vinegar to avoid buildup. These small steps can help you steer clear of mold, structural water damage, and even pest infestations that thrive in damp areas.
Each DIY repair you tackle builds your confidence for future home maintenance. Modern faucets are designed to be user-friendly, and with just a few basic tools, you’ll find that the process gets easier every time.
Stay proactive by checking your faucets regularly. A little effort now can save you from bigger headaches – and higher bills – down the road.
If your faucet continues to leak after replacing the parts, take a closer look at the valve seat – corrosion or damage here is a frequent culprit. Make sure the cartridge is properly aligned and firmly secured. Don’t forget to examine the O-rings and seals for any signs of wear or cracking, and replace them if necessary.
Should the issue remain unresolved, ensure all connections are tightened securely and check for debris that might be blocking the internal components. For more specific guidance, refer to the manufacturer’s manual for troubleshooting tips tailored to your faucet model.
To figure out what type of faucet you have, start by examining its design and how the handle works. The most common types include compression, cartridge, ball, and ceramic disk, each with unique characteristics.
You can also look for visible components, like a cartridge or ball mechanism, beneath the handle. Identifying your faucet type is essential for selecting the correct repair techniques and replacement parts.
Replacing washers and O-rings is a crucial step in tackling faucet leaks. These tiny components are often the culprits behind annoying drips and unnecessary water waste. Over time, they naturally wear down, which can lead to leaks if not addressed. Swapping them out regularly is a straightforward way to stop leaks, conserve water, and ensure your faucet stays in good working order for years to come.
The best part? Washers and O-rings are affordable and simple to replace. This makes them a quick, cost-effective fix that can save you from dealing with bigger, more expensive plumbing issues later on.