New! DIY Project Planner. Plan smarter, skip the spreadsheets. Start Your Free Trial Today →

Smart DIY & Home Improvement Tips
Smart DIY & Home Improvement Tips
DIY projects often run late because people underestimate prep, dependencies, and skill gaps—use realistic estimates, buffers, and step-by-step planning.
DIY projects often take far longer than planned. Why? Most of us underestimate complexity, ignore hidden tasks, and assume everything will go smoothly. Research shows 78% of homeowners face delays, often by 50% or more. This happens because of:
How to avoid delays? Use realistic time estimates, plan for setbacks, and break projects into smaller steps. Add buffer time (e.g., double your initial estimate) and learn from similar projects. With better planning, you can finish on time and avoid unnecessary stress.
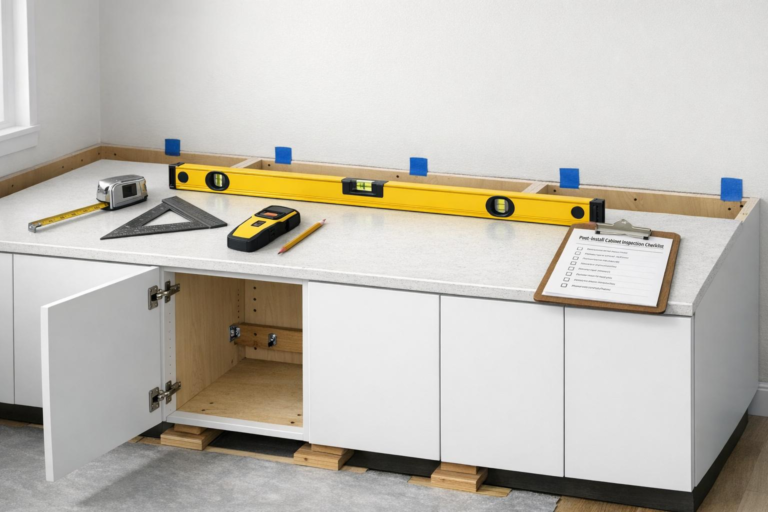
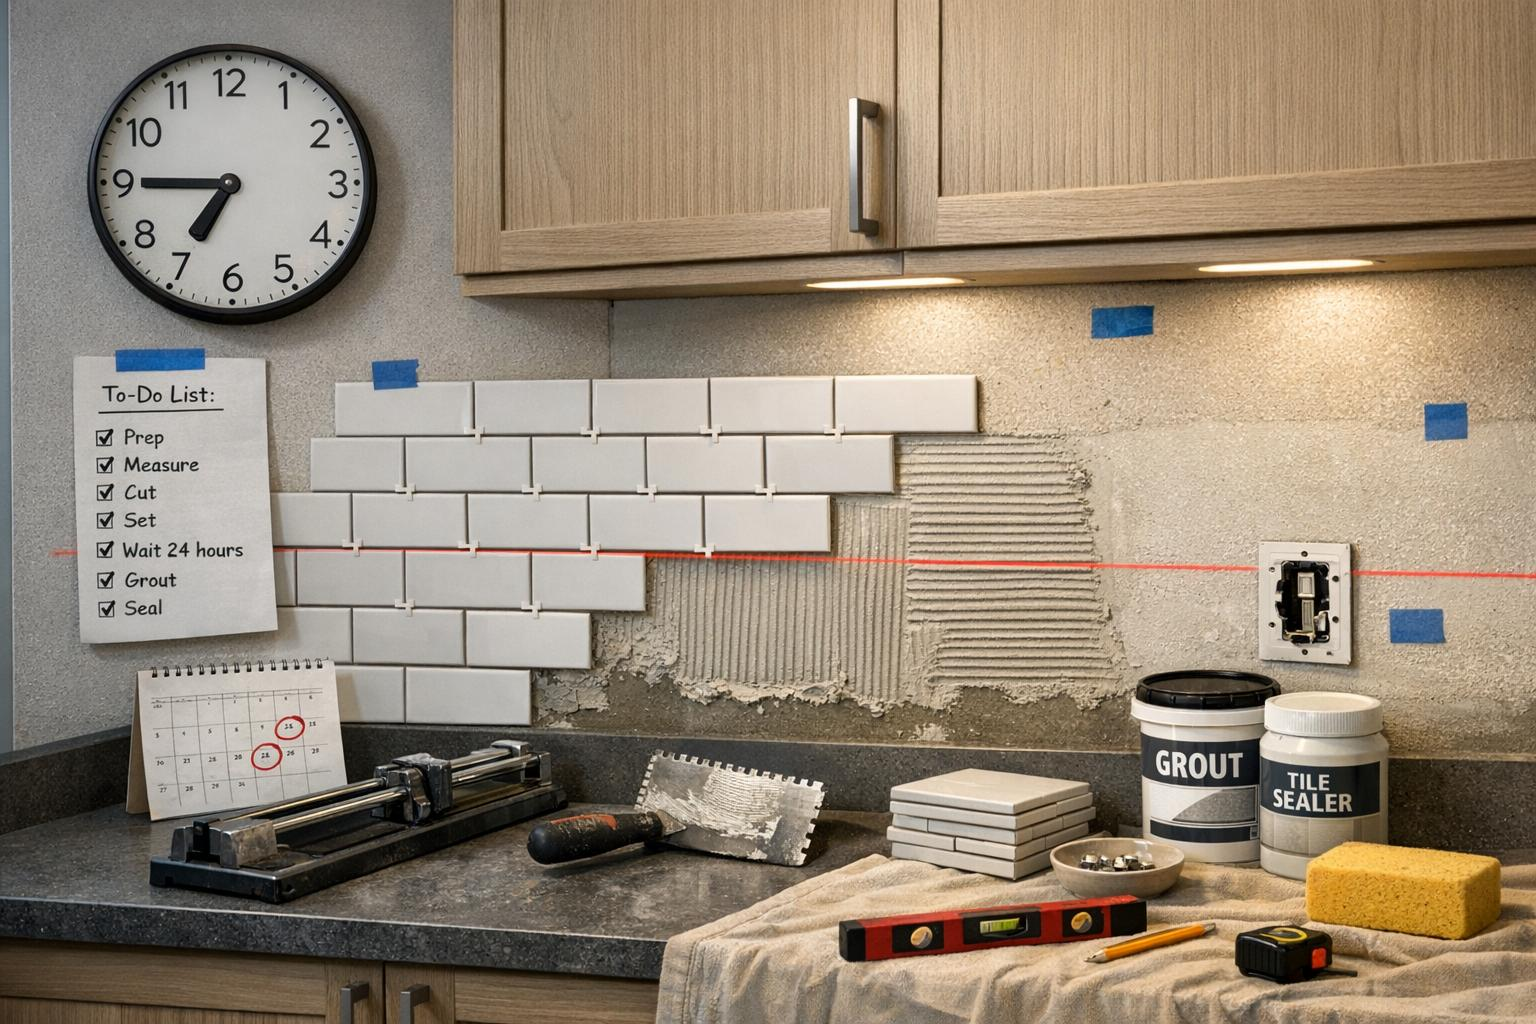
When tackling a DIY project, people often focus solely on the main task – like installing cabinets or laying tile – while overlooking the prep work and cleanup that eat up just as much, if not more, time. This narrow focus can lead to major delays. Take painting a room, for example: it’s not just about rolling paint on the walls. There’s furniture to move, trim to tape, holes to patch, priming to do, multiple coats to apply, and, of course, cleanup.
The hidden tasks in any project often take longer than the main event. Before you even pick up a tool, hours might go into prep work like measuring to make sure surfaces are level, sanding, cleaning, or priming. In fact, prepping a space can easily outlast the installation itself. And let’s not forget logistics: 30% of home renovations face delays due to permit applications and inspections. On top of that, DIYers frequently underestimate the time spent hunting for the perfect materials and tools.
Christopher Hurkens, owner of Chris Fix It, sums it up perfectly:
"Finishing – Trim, paint, etc – take much longer than people guess. Once drywall is up, people think they’re almost done. No, now you’ve started".
And cleanup? It’s not just a one-time thing. If you don’t stay on top of clearing debris and organizing tools daily, your workspace becomes chaotic, slowing down every step that follows. Beyond these overlooked tasks, many DIYers also fail to account for how one task depends on another.
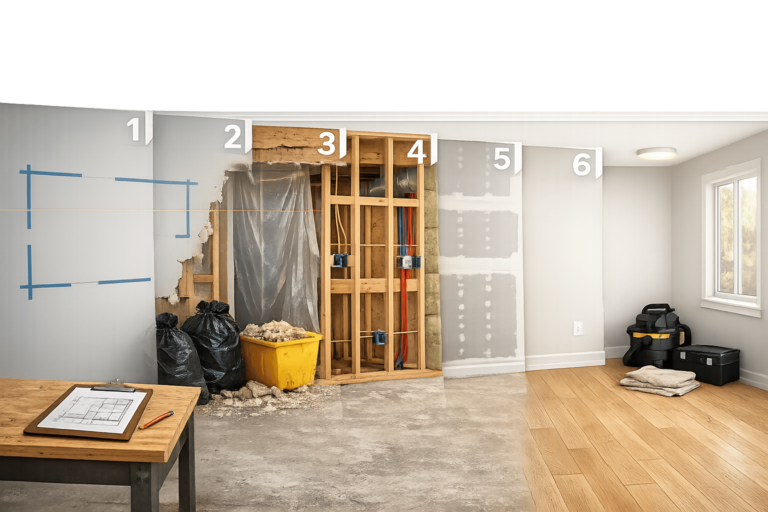
DIY projects often involve a sequence of steps, and missing these dependencies can create frustrating bottlenecks. For instance, you can’t install a backsplash until the countertops are in place. Drywall can’t go up until electrical rough-ins pass inspection. Even something as simple as painting requires waiting for the first coat to dry before applying the next. And if you’re working with wood outdoors, rain can delay progress by two extra days while you wait for it to dry out.
Julia Galef, co-founder of the Center for Applied Rationality, explains why these delays pile up:
"The more steps you have in whatever project or task you’re working on, the greater the chance that in one of those steps you’re going to hit a snag and it’s going to turn out to be atypical".
Add in things like custom cabinetry with a six-week lead time or specialty windows on backorder, and it’s easy to see how missed dependencies can snowball into weeks of delays. Each overlooked step compounds the timeline, making what seemed like a straightforward project far more time-consuming than expected.
DIYers often underestimate how long projects will take, even when past experiences suggest otherwise. This tendency, called the planning fallacy, leads people to focus on ideal outcomes while ignoring previous delays. For example, research shows that industrial research and design projects typically take 3.5 times longer than initially planned. Even industry professionals frequently miscalculate timelines. The issue lies in focusing on the perfect scenario while overlooking potential setbacks, like tool breakdowns or material shortages. This misplaced optimism makes it easy to underestimate the practical challenges on-site, which inevitably stretch timelines further.
DIYers often calculate timelines based only on visible tasks, forgetting about other crucial steps like preparation, delays, and cleanup. Factors such as bad weather, late material deliveries, and day-to-day interruptions can add significant time to a project. What’s more, these estimates are often made in calm, distraction-free environments, which don’t account for the physical and mental toll of the actual work. Once the project begins, fatigue and interruptions can make even straightforward tasks take much longer than expected.
Instead of relying solely on your "ideal" timeline (known as the "inside view"), try using the "outside view" – a method called Reference Class Forecasting. This involves comparing your project to similar ones. For example, instead of guessing how long your bathroom remodel will take, ask, "How long do bathroom remodels typically take?". Another helpful technique is the pre-mortem exercise: imagine your project has already failed, then brainstorm potential reasons why. Research shows this approach can improve risk identification by 30%.
One particularly effective trick is the "double and shift" rule: take your initial estimate, double it, and shift to the next larger time unit. For instance, if you think a project will take two days, plan for it to take up to four weeks. While this might seem excessive, it often aligns more closely with reality than overly optimistic guesses. These strategies not only help you create more realistic timelines but also improve your ability to sequence and manage the entire project.
Tackling tasks in the wrong order can throw your entire timeline off course. Construction and renovation projects rely on a logical sequence – each step often depends on the one before it. When tasks are done out of order, it can lead to rework, delays in materials, or workers sitting idle. This problem ties back to earlier discussions about hidden time drains in DIY projects, underscoring the need for careful, step-by-step planning.
Mistakes in task order often result in wasted effort and extra costs. For example, installing flooring before baseboards might mean extra trim work and cleanup later. Similarly, hanging cabinets before completing rough-ins for plumbing and electrical systems can force you to remove and reinstall them if adjustments are needed.
One of the most costly errors is starting work without finalizing layouts. Ivan Volovenko, a general contractor from Ivenko, Inc., emphasizes this point:
"Contractors need clear information early, including electrical outlet locations, kitchen cabinet layouts, appliance placements, and plumbing elevations. If your renovation plan is incomplete… work might need to pause to avoid mistakes, wasted labor, and budget overruns."
Another common issue is ordering essential materials too late, which can grind progress to a halt and leave workers waiting for supplies.
To avoid delays, focus on identifying your critical path – the sequence of tasks that directly impacts your project’s timeline. For instance, permits and approvals can take anywhere from 2 to 10 weeks, so scheduling rough-in inspections at least 48–72 hours in advance can help prevent multi-day stoppages.
Planning backward from your target completion date is a practical way to identify critical tasks early. Start by locking in non-negotiables – like permit approvals and material lead times – then organize the rest of the work around those milestones. This approach clarifies which decisions need immediate attention and which can wait. As Cameron Figgins, President of Absolute Maintenance & Consulting, points out, unexpected issues such as:
"rotted out studs, surprise load paths, and undocumented piping can add an extra 10 to 21 days to your schedule."
Even with a solid plan in place, lacking the proper tools or skills can turn a straightforward project into a frustrating ordeal. Homeowners often try to make do with the tools they already own, but this can lead to poor results – or worse, damage. For instance, using a standard drill for masonry work can overheat the motor and cause unnecessary stress, while a hammer drill gets the job done quickly and effectively.
Sometimes, it’s the smallest things – like a missing drill bit or using the wrong type of screw – that bring progress to a screeching halt. These unexpected stops can waste hours and derail your schedule. In fact, material shortages rank among the top three reasons construction projects fall behind. To avoid this, conduct a thorough tool audit before starting:
For expensive specialty tools like floor sanders or power drills, renting is a smart move. It ensures you have the right equipment without a hefty upfront investment. Skimping on tools or attempting tasks beyond your expertise often leads to more delays and headaches.
Tackling complex projects without the right experience can be a recipe for mistakes, delays, and unexpected costs. In fact, 35% of DIYers eventually hire a professional to fix or complete their work, spending an average of $862 in additional fees. Tasks like electrical wiring, plumbing, or structural modifications aren’t just tricky – they often require specialized knowledge or licensing. As one professional wisely advises:
"If something comes with a risk to your health or home, do not attempt this and call a professional to complete the job for you."
– Professional Service Person, Angi
While learning as you go might seem appealing, it can stretch timelines and ramp up stress. Be honest about your skill set before diving in. The best DIY projects for saving money are those that are labor-intensive but don’t require technical expertise – think painting, demolition, or basic landscaping. On the other hand, tasks demanding precision or involving safety risks are best left to the pros. Bridging the gap in tools and skills is crucial to keeping your project on track and avoiding unnecessary setbacks.
Unforeseen problems can quickly derail even the most carefully planned DIY projects. A telling statistic? 52% of Americans believe home renovations always take longer than expected. Many DIYers make the mistake of crafting schedules based on ideal conditions – assuming perfect weather, timely material deliveries, and no hidden surprises. This kind of optimism often ignores lessons from past delays, leading to timelines that crumble once reality sets in.
Several factors can throw your project off track. For outdoor work, weather is a major disruptor. Rain can prevent concrete from setting, paint from drying, or adhesives from bonding. Extreme temperatures can also create unsafe conditions for workers. Then there are material delays – especially with custom items like cabinetry, tiles, or plumbing fixtures, which can take weeks to arrive. And let’s not forget the surprises lurking behind walls. Mold, rotted studs, or outdated wiring can surface during demolition, adding both time and expense. As Cameron Figgins, President of Absolute Maintenance & Consulting, puts it:
"Rotted out studs, surprise load paths, and undocumented piping can add an extra 10 to 21 days to your schedule".
These delays are compounded by task dependencies and overly optimistic scheduling. Even something as routine as a missed inspection can grind progress to a halt for a week or more.
The best way to handle these uncertainties? Build extra time into your plan. Experts suggest padding your schedule with 20% to 50% additional time for typical setbacks. For tasks that must be completed before others can begin, consider increasing that buffer to 50%. One popular approach, the "Double and Shift" method, suggests doubling your estimated time and moving to the next unit. For example, if you think a project will take two weeks, plan for four weeks instead.
Another useful tactic is conducting a pre-mortem. Spend 15 minutes identifying potential problems before starting your project. Research shows this simple exercise can improve your ability to predict future issues by 30%. Additionally, order materials with long lead times early, schedule inspections as soon as rough work is completed, and accept that unexpected delays are often part of the process.
At Gold Team Home, we believe that building a timeline with room for contingencies is essential for navigating the inevitable surprises of home improvement projects.
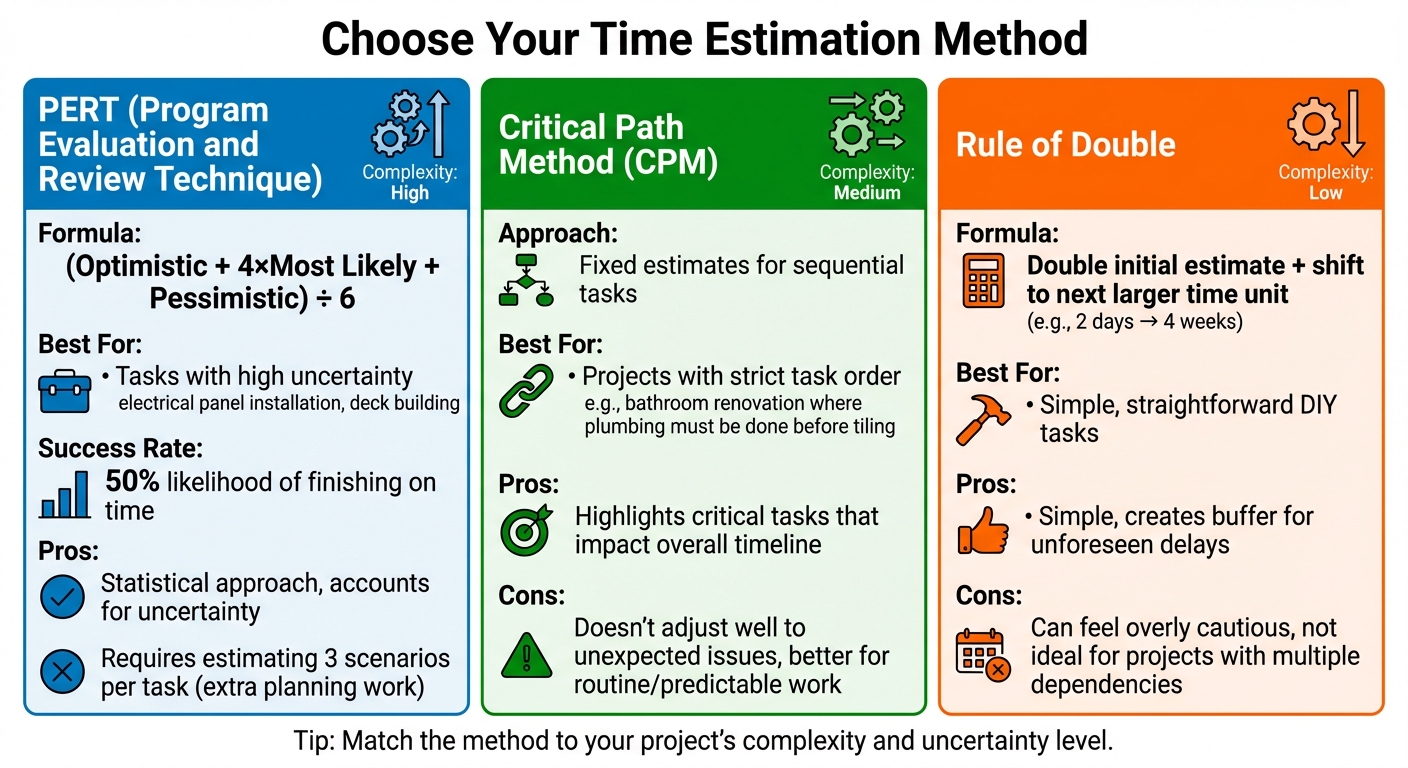
Comparison of DIY Time Estimation Methods: PERT vs CPM vs Rule of Double
Accurate time estimation plays a key role in keeping DIY projects on schedule. By understanding and selecting the right method, you can avoid delays and manage your timeline more effectively. Different tasks call for different approaches, so let’s break down a few tried-and-true methods.
PERT (Program Evaluation and Review Technique) uses a weighted formula: (Optimistic + 4×Most Likely + Pessimistic) ÷ 6. This method is particularly helpful for tasks where uncertainty looms large – think installing an electrical panel or building a deck. However, even with this statistical approach, the likelihood of finishing on time is only 50%. It’s also worth noting that PERT requires estimating three scenarios for each task, which can add extra work to your planning process. If your project involves a strict sequence of tasks, another method might be more effective.
The Critical Path Method (CPM) shines in projects where the order of tasks is non-negotiable. For example, in a bathroom renovation, plumbing must be completed before tiling can start. CPM relies on fixed estimates and highlights tasks that must stay on schedule to avoid derailing the entire project. Its downside? It doesn’t adjust well to unexpected issues or variations, making it better suited for routine, predictable work rather than projects with many unknowns. For simpler projects, however, a more basic approach might be all you need.
The Rule of Double offers a no-frills way to estimate time for straightforward DIY tasks. By doubling your initial estimate and bumping it to the next larger time unit – planning for four weeks instead of two – you create a buffer that accounts for unforeseen delays. While simple, this method can sometimes feel overly cautious and isn’t ideal for projects with multiple dependencies or specialized steps.
Sticking to a timeline for DIY projects often feels like a challenge, but it’s one you can tackle with a realistic and proactive mindset. Delays usually happen when we underestimate how complex a project might be, skip over prep work, or assume everything will go perfectly. In fact, studies show that between 80% and 90% of projects run past their deadlines.
The good news? You can avoid these pitfalls. Start by taking an "outside view" – base your timeline on how long similar projects have taken, not just your best-case scenario. Break your project into smaller, manageable tasks, identify what depends on what, and don’t forget to account for the extra stuff, like trips to buy materials, maintaining tools, and cleaning up.
Here’s a tip that might feel counterintuitive: add buffer time. Take your original estimate, double it, and move to the next unit of time. For example, if you think a project will take two days, plan for up to four weeks. Another helpful strategy is to perform a pre-mortem. Imagine your project has failed a year from now – what went wrong? Listing those potential issues can help you plan for them and improve your foresight by up to 30%.
Acknowledging our tendency to be overly optimistic is key. As psychologist Daniel Kahneman puts it:
"The Planning Fallacy is that you make a plan, which is usually a best-case scenario. Then you assume that the outcome will follow your plan, even when you should know better".
At Gold Team Home, we focus on providing practical, field-tested tips that address the real-life challenges of home improvement. Track how much time you actually spend on projects to create a personal reference point, finalize all material choices before starting, and remember that success begins with realistic planning. By recognizing common stumbling blocks and planning accordingly, you’ll be far more likely to finish your project on time.
When trying to estimate how much time a DIY project will take, it helps to break it into smaller, manageable tasks. By estimating the time needed for each individual step, you can get a clearer picture of the overall timeline. Techniques like bottom-up estimation or reviewing historical data from similar projects are especially useful here.
To account for unexpected delays (because let’s face it, they happen), consider doubling your initial estimate. This helps counteract optimism bias – the tendency to underestimate how long things will actually take. Another tip? Keep track of your past projects. By comparing your original guesses to the actual time spent, you can fine-tune your estimating skills and get better at planning future DIY endeavors.
When planning a project, it’s crucial to factor in tasks that might not immediately come to mind but can significantly impact your timeline. For instance, you might need to address unexpected issues like structural challenges, which can pop up during construction or renovations. Additionally, delays caused by material shortages, permit approvals, or even weather conditions can throw off your schedule if not accounted for.
Don’t forget the smaller steps, either. Things like drywall patching or painting may seem minor but can add up if overlooked. By including all these elements in your schedule, you’ll create a timeline that’s not only more realistic but also better equipped to handle potential setbacks.
When tackling projects that are complicated, carry risks, or demand specific expertise – like plumbing, electrical work, or structural repairs – it’s wise to bring in a professional. If you don’t have the right tools, experience, or if safety could be an issue, hiring an expert can save you from expensive mistakes, delays, or even dangerous situations. For tasks where precision and safety are non-negotiable, professional help guarantees the job is done correctly and built to last.