New! DIY Project Planner. Plan smarter, skip the spreadsheets. Start Your Free Trial Today →

Smart DIY & Home Improvement Tips
Smart DIY & Home Improvement Tips
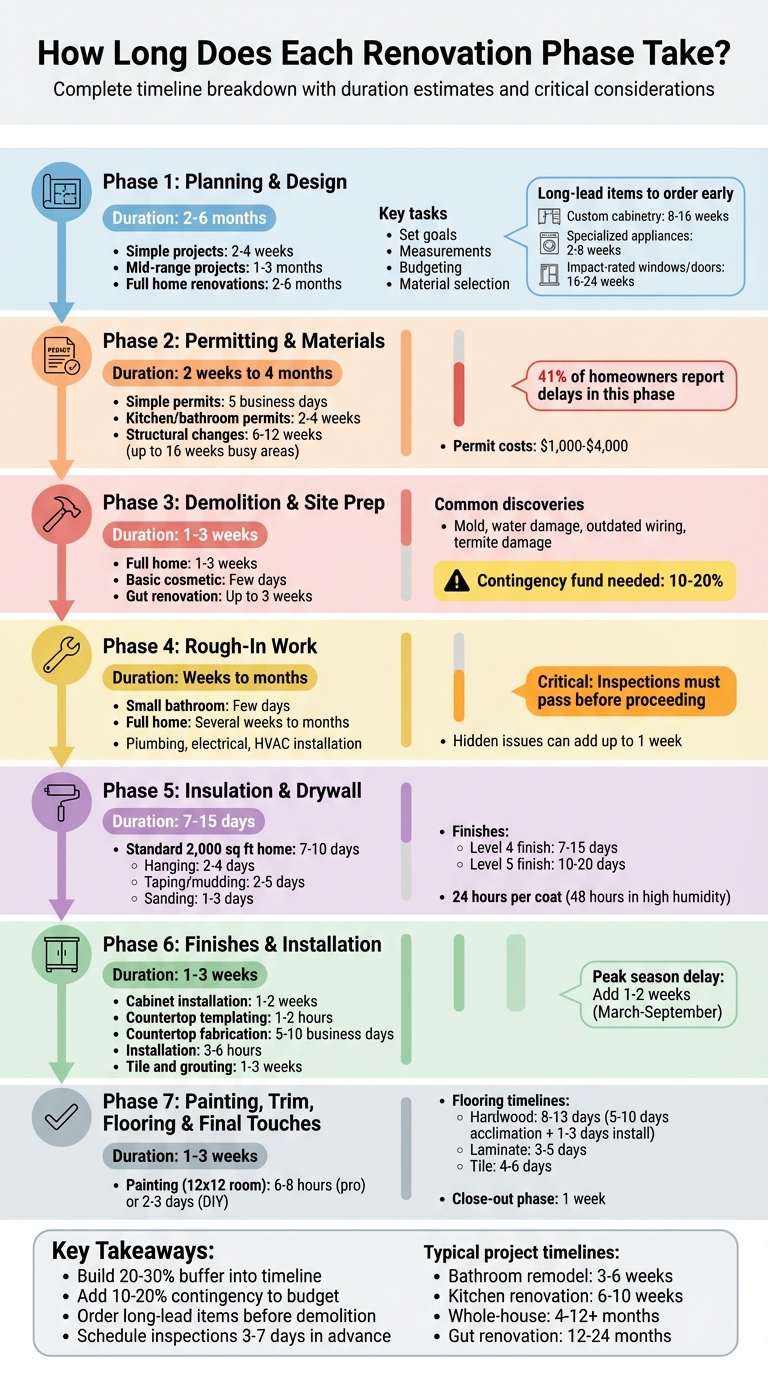
Realistic renovation timelines by phase - expect permit waits, material lead times, hidden issues, and build a 20-30% time buffer.
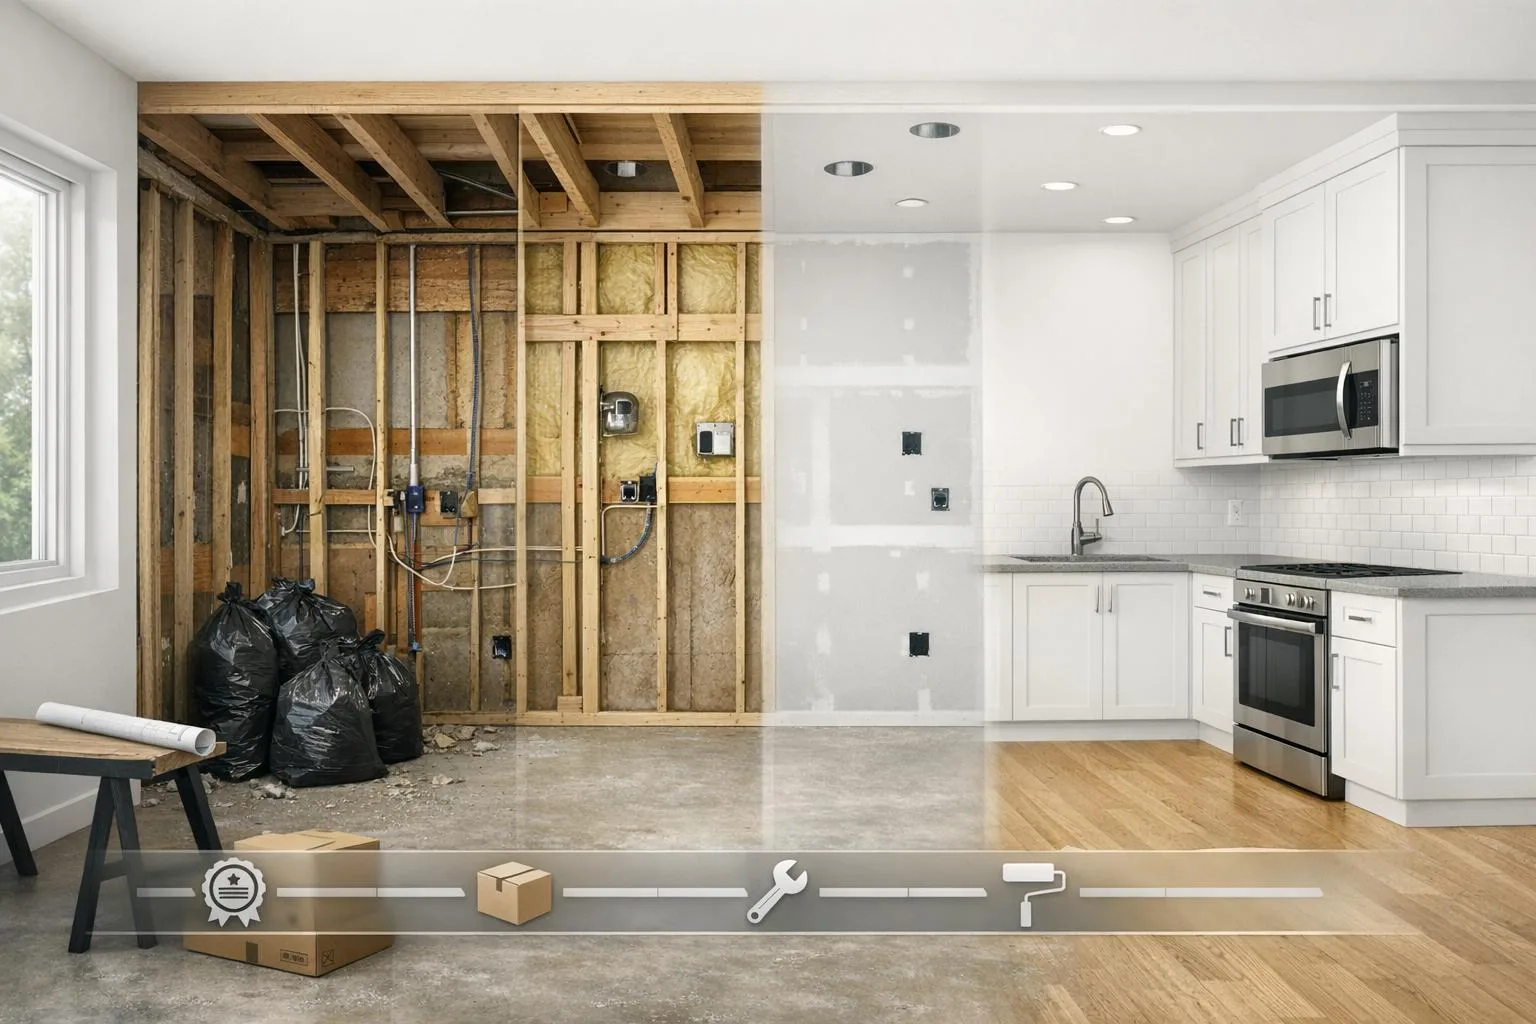
Renovations take time and careful planning. Each phase – planning, permitting, demolition, rough-in work, drywall, finishes, and final touches – has its own timeline. Here’s a quick breakdown:
Delays often stem from permitting, materials, or unexpected issues. Build a 20–30% buffer into your timeline and budget to avoid surprises. Proper preparation, early material orders, and regular contractor check-ins can keep things on track.
Complete Home Renovation Timeline: 7 Phases from Planning to Completion
The time needed for the planning and design phase depends on the project’s complexity. For simple projects like a bathroom refresh, expect 2 to 4 weeks of planning. Mid-range projects – think kitchen redesigns or multi-room renovations – usually take 1 to 3 months. Meanwhile, full home renovations are the most time-intensive, requiring 2 to 6 months of detailed preparation.
Kitchen renovations are a prime example of how planning often takes longer than construction. This extra time is far from wasted – rushing or skipping decisions during planning can lead to costly change orders during construction, which inevitably extend timelines.
"The biggest variable in kitchen timelines is often cabinet lead time. Planning your kitchen layout and cabinet order well in advance can save weeks, if not months." – House Remodel Editorial Team
During this phase, you’ll focus on setting clear project goals, taking accurate measurements, creating a budget, and choosing materials and finishes. Decisions about layouts, fixtures, and structural changes are crucial. For kitchens, this means finalizing cabinet configurations and appliance placements. For bathrooms, it involves selecting shower dimensions and vanity locations.
One key takeaway: order long-lead items early. Custom cabinetry often requires an 8- to 16-week lead time, while specialized appliances may take 2 to 8 weeks. Impact-rated windows and doors can take even longer – 16 to 24 weeks. Placing these orders before construction begins helps avoid unnecessary delays.
While these steps are essential, several factors can stretch the timeline.
The duration of the planning phase isn’t just about completing tasks – it also depends on factors like project complexity and the availability of professionals. Design complexity plays a major role. A straightforward refresh with new paint and fixtures moves quickly, but a full kitchen remodel with custom cabinetry and plumbing changes takes much longer. Another factor is decision-making speed. Homeowners often face "decision bottlenecks" when they hesitate to finalize layouts or material choices, which can significantly delay progress.
Professional availability is another variable. Hiring a construction firm for a midsize renovation typically adds 2 to 6 weeks to the timeline. The average wait to secure a contractor is about 4.8 weeks. In areas like Coral Gables or Miami-Dade, additional requirements – such as architectural reviews or High Velocity Hurricane Zone compliance – can extend the pre-construction phase by several months.
"Projects rarely slip because of one giant mistake. They slip by a dozen small ones." – Shital Gohil, Co-founder and COO of Styldod
To avoid surprises, experts suggest building a 20 to 30% contingency buffer into your renovation timeline. On the financial side, adding a 10% to 20% contingency to your budget can help cover unexpected costs, like structural issues or last-minute design changes.
With your project plans ready, the next step involves tackling permitting requirements and securing the materials needed for construction.
Permit timelines can vary greatly depending on your project’s complexity and the workload of your local building department. For simple over-the-counter permits – like replacing a water heater – you’re looking at about 5 business days for approval. For kitchen or bathroom renovations involving plumbing and electrical work, expect 2 to 4 weeks. Projects involving structural changes or additions typically take 6 to 12 weeks for plan review, but in busy urban areas or jurisdictions with unique requirements, the process can extend to 8 to 16 weeks.
Delays are common. In fact, 41% of homeowners report significant setbacks tied to permitting and material lead times. One major culprit? Incomplete applications. As Cutting Edge Innovative notes:
"Incomplete permit applications are one of the most common causes of delays, and an experienced contractor will submit complete packages the first time".
Permit costs in the U.S. usually range between $1,000 and $4,000, depending on the size and scope of your project. While permits ensure your project complies with local regulations, ordering materials on time is just as critical to keeping construction on track.
Lead times for materials can vary significantly. Here’s a breakdown of common timelines:
Delays in one order can create a "cascade effect", where late arrivals of critical items hold up multiple trades. For instance, an 8-week window delay can lead to $13,000 to $17,000 in losses, including construction loan interest and risks like weather damage. Similarly, a 10-week cabinet delay can result in $15,000 to $22,000 in costs because it prevents finishing the kitchen and passing final inspections.
To avoid unnecessary delays, submit permit applications as soon as your design is finalized. This allows the review period to overlap with your final planning stages. For materials, order long-lead items early and keep track of every order in a central spreadsheet. Include details like order dates, quoted lead times, and expected delivery dates, and follow up with suppliers weekly to confirm schedules.
Experts suggest adding a 20% to 30% time buffer to all quoted lead times to account for unexpected hiccups. Before your official municipal inspection, conduct a mock inspection 24 to 48 hours in advance to catch minor issues, such as missing nail plates or straps. If your home was built before 1978, remember to comply with the EPA RRP Rule, which may require certified renovators and additional documentation. Lastly, have backup options ready – identify alternative manufacturers or stock products for critical items in case your primary supplier faces delays.
Demolition marks the beginning of transformation, where outdated finishes and fixtures are stripped away to expose the structure for upcoming installations.
The time needed for demolition depends on the scope of your renovation. For a full home overhaul, this phase usually takes 1 to 3 weeks. A basic cosmetic update – like removing old flooring and fixtures – might only take a few days. On the other hand, a more extensive gut renovation, involving tasks like tearing down non-load-bearing walls, cabinetry, and drywall, can stretch closer to three weeks.
During this phase, you’ll tackle tasks such as removing flooring, fixtures, drywall, and other finishes, followed by clearing all debris from the site. However, unexpected issues discovered during demolition can sometimes extend the timeline.
Demolition can often uncover hidden problems lurking behind walls or under floors. As Cutting Edge Innovative points out:
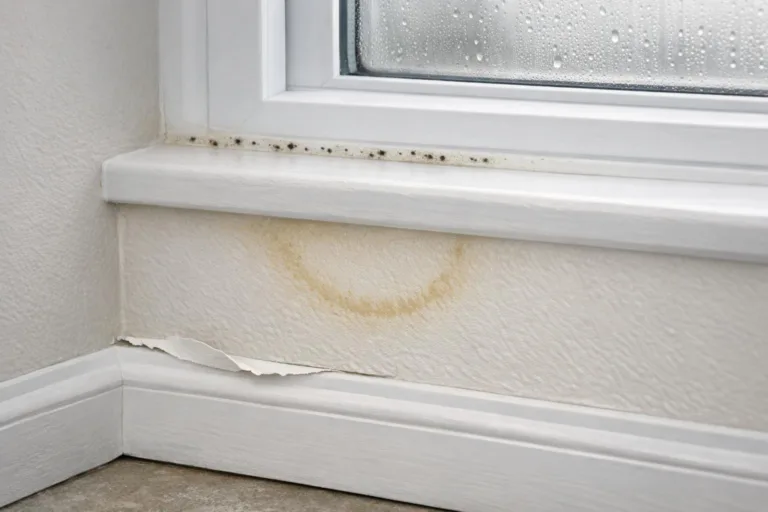
"Demolition is also the stage where hidden problems show up. Mold, water damage, outdated wiring, termite damage, and structural issues are all common discoveries behind walls and under floors in older homes".
In homes that are 40 to 70 years old, it’s not unusual to find corroded plumbing, faulty wiring, or other forms of hidden damage. These issues need to be addressed immediately to ensure both safety and long-term stability. For example, tackling unexpected plumbing problems could add several days – or even up to a week – to your timeline.
To avoid budgetary shocks, it’s wise to set aside a 10% to 20% contingency fund for these surprises. Careful planning and realistic scheduling during demolition will help keep your project on track, setting a solid foundation for the next phase: rough-in work.
Once demolition and structural adjustments are complete, the rough-in phase begins. This stage focuses on installing essential systems – plumbing, electrical, and HVAC – before walls are sealed up.
The duration of rough-in work depends on the project’s size and complexity. For instance, roughing in a small bathroom might take just a few days, while a full-scale home renovation can stretch this phase to several weeks or even months. During this time, contractors handle key tasks like installing water pipes, electrical wiring, outlet boxes, and HVAC ductwork .
However, older homes often come with surprises. Outdated wiring, rusted plumbing, or hidden structural issues can surface during this phase. As Windermere Real Estate explains:
"Any wiring, plumbing or venting that is found to be damaged, dangerous or just not up to par with your municipality’s building code will likely need to be remedied".
These unexpected fixes can tack on up to a week to your timeline. To prepare for such delays, it’s smart to build in a 10%-20% buffer for your schedule. Getting the rough-in phase right is critical because it lays the groundwork for smooth progress into insulation and drywall installation.
This stage requires close collaboration between plumbers, electricians, and HVAC technicians, who must follow a precise order to prevent conflicts. Windermere Real Estate points out that existing framing can complicate mechanical installations, making coordination even more crucial. Any delays at this stage can cascade into future phases, so efficiency is key.
Inspections also play a major role during rough-in work. Local building authorities must approve all installations to ensure they meet safety and code standards before walls are closed . Brooke MacLean from Punchlist cautions:
"Failed inspections during rough-in phases are a leading cause of delays… a single failed inspection can push timelines back by weeks or even months".
To prevent such setbacks, schedule inspections early and conduct a detailed walkthrough before closing walls. Double-check outlet placements, confirm HVAC vents are positioned correctly (so they don’t blow air directly onto thermostats), and ensure plumbers have pressure-tested all pipes to catch leaks early on. These steps can save time and prevent costly fixes later.
Once rough-in inspections are completed, the insulation and drywall phase begins, transforming bare framing into finished walls. This process involves adding insulation to walls and ceilings, installing drywall sheets, and performing taping, mudding, and sanding to create smooth surfaces. It lays the groundwork for the finishing touches that follow.
For a standard 2,000-square-foot home, this phase typically takes about 7–10 days. Here’s a breakdown:
The finish level can influence the timeline. A Level 4 finish generally takes 7–15 days, while a Level 5 finish – requiring a full skim coat – might stretch to 10–20 days.
Environmental factors play a huge role in drying times. Under optimal conditions (64–75°F with 40–60% humidity), joint compound needs 24 hours to dry between coats. However, high humidity or rainy weather can double that drying time to 48 hours per coat. Renovations tend to take 25–40% longer than new builds because crews need to protect existing surfaces and blend new drywall with old walls.
Architectural details also impact the timeline. Simple 8-foot walls with minimal openings are quicker to complete. However, features like vaulted ceilings, curved walls, or complex angles requiring custom cuts can significantly slow progress.
Bar Zakheim, CEO of Better Place Design & Build, emphasizes the importance of hiring skilled professionals:
"If you want a good finish on your wall, it’s absolutely worth it to pay for professional taping and mudding. Many DIYers are tempted to pay someone to hang the drywall and do the rest themselves, but this is one area where a skilled contractor can make a huge difference."
Professional two-person crews can install 35–50 drywall sheets per day under normal conditions, working three to four times faster than DIY efforts. Using specialty materials like soundproof drywall on resilient channels can add 30–50% more time due to the extra labor involved.
A well-done insulation and drywall phase ensures the finishing steps stay on track.
Several challenges can arise during and after installation, but proper planning can help mitigate them.
Once the walls are prepped and smooth, it’s time for the finishes and installation phase – the point where your space truly starts to come together. Cabinets, countertops, tiles, and appliances are installed, turning empty rooms into functional, polished areas. This phase requires careful sequencing to ensure everything fits and works as planned.
Typically, this phase takes about 1–3 weeks to complete, depending on the scope of work. Here’s a breakdown:
However, certain factors can extend this schedule. For example, custom cabinetry can take up to 16 weeks to arrive. As noted by the House Remodel Editorial Team:
"The biggest variable in kitchen timelines is often cabinet lead time. Planning your kitchen layout and cabinet order well in advance can save weeks, if not months".
During countertop installation, expect a brief disruption – 1–3 days – when your kitchen may be out of commission. After installation, countertop caulk and sealer need 24–48 hours to cure before heavy water use. It’s also worth noting that peak renovation seasons (March through September) can add 1–2 weeks to your timeline due to higher workloads.
Preparation is your best ally here. As SlabWise emphasizes:
"The biggest time-saver is having everything ready: cabinets installed and level, sink and faucet chosen, and the job site clear".
Here are a few tips to streamline the process:
If you’re working with natural stone like granite or marble, visiting the slab warehouse in person is highly recommended. Natural materials vary in appearance, so selecting your exact piece ensures you’re happy with the final look. For precision, consider laser templating, which captures 3D measurements and accounts for wall irregularities, reducing the risk of fitment issues.
After the finish installations, the painting and trim phase brings the space closer to completion. This stage covers everything from painting ceilings to installing baseboards, with the time needed depending on the room’s size and complexity.
Once finishes are in place, painting and trim work is essential for achieving that polished, professional look. For instance, painting a 12×12 bedroom typically takes professionals 6–8 hours, while larger rooms might require an entire day. If you’re tackling the job yourself, plan for about 2–3 days for a standard room (approximately 200 square feet of wall space): one day for preparation and priming, followed by two days for applying multiple coats.
The process usually starts with the ceiling, then moves to the walls, and finishes with the trim. This order ensures that any drips or overspray land on areas that haven’t been painted yet. Interior paint generally requires 2–4 hours of drying time between coats under normal conditions, though high humidity can stretch this to 4–6 hours. Keep in mind that paint fully cures in about 30 days.
Preparation is a major part of the process, accounting for roughly 70% of the total effort. This includes cleaning the walls with a TSP (trisodium phosphate) solution and allowing them to dry for 24 hours before painting . Professional painters can edge-paint significantly faster than DIYers, often completing a 12×12 bedroom in 6–8 hours, while a DIY project might take 2–3 weekends. This phase is critical for bridging the gap between finish installations and the final touches.
Getting professional-quality results comes down to using the right techniques and tools. Always keep a "wet edge" by rolling into freshly painted areas while the paint is still wet – this helps prevent lap marks. For trim work, use angled-sash paintbrushes: a 1.5-inch brush for detailed areas and a 2.5-inch brush for larger moldings. When painting trim, work from the inside edge outward to avoid paint pooling.
Remove painter’s tape 1–2 hours after the final coat has dried but before the paint cures to avoid peeling. For trim, choose semi-gloss or high-gloss finishes to enhance durability and highlight architectural features, while flat or matte finishes work well for walls and ceilings to conceal imperfections. If you’re transitioning from a dark color to a lighter one, add an extra day to account for the additional coats required.
Once the painting and trim look flawless, the project naturally progresses to the flooring and final touches phase.
Once the painting and trim work are done, the real transformation begins. With walls freshly painted and trim in place, the focus shifts to flooring and the final adjustments that will bring your space to life. This phase usually takes around 1 to 3 weeks.
The time needed for flooring depends on the material. For instance:
If you’re opting for intricate designs like herringbone or parquet, be prepared for extended timelines – these patterns can take two to three times longer than standard layouts. Similarly, spaces with obstacles like fireplaces, built-in furniture, or stairs may require custom cuts and fittings, which can add hours or even days to the process.
Once the flooring is installed, the focus moves to the final adjustments. The "close-out" phase includes tasks like finishing punch-list items, attaching outlet covers, installing cabinet hardware, testing all systems (electrical and plumbing), and a thorough professional cleaning. This stage typically takes about 1 week . As Brock Malinowski from EHR Contracting puts it:
"This is where everything gets buttoned up. Our team makes sure no detail is overlooked, and the site is spotless before we hand the space back over to you".
With the flooring in place, the final step is ensuring every detail is addressed. A detailed checklist can help you track any remaining tasks. During your final walkthrough with the contractor, check for issues like paint touch-ups, cabinet hinge adjustments, or gaps in the trim that need caulking. Test all light switches, faucets, and appliances to confirm that electrical and plumbing systems are working properly. This review ensures that every stage of the renovation – from demolition to finishing – meets quality expectations.
Don’t forget to review care instructions for new materials, such as hardwood floors or stone countertops, to maintain them properly. Wrap up the project by completing final inspections, closing out permits, and obtaining any required building management approvals . It’s also wise to budget for any unexpected flooring issues that might arise during installation. Once all tasks are checked off and the space is professionally cleaned, your renovation is officially complete.
Even the best-planned renovations can hit unexpected delays. Understanding common causes helps you set realistic expectations and reduce disruptions. David Haziza, Owner of A2Z Construction Management, explains:
"The biggest source of delay comes from owners who are unsure of what they want – early planning helps prevent that".
While owner indecision is a frequent issue, other factors can also derail timelines. For instance, materials with long lead times can slow progress. Permit approvals, depending on your location, might take anywhere from a few weeks to over three months. Weather also plays a role, especially for exterior work. Experts suggest accounting for one weather delay day for every four days scheduled during rainy seasons.
Unforeseen issues discovered during demolition – like outdated electrical systems, corroded plumbing, mold, or pest infestations – often require immediate fixes before the project can move forward. On top of that, failed inspections can set you back by one to two weeks per occurrence. Interestingly, 25% of DIY renovations end up needing professional help, causing further delays. These examples show how one delay can ripple through the entire project, underscoring the importance of planning and preparation.
Each phase of a renovation is vulnerable to certain types of delays. Here’s a breakdown of common issues, their impact, and ways to minimize them:
| Delay Factor | Phase Most Affected | Impact on Timeline | Mitigation Strategy |
|---|---|---|---|
| Permit Approvals | Planning & Permitting | 4 weeks to 3+ months | Submit complete plans early and confirm requirements |
| Material Shortages | Materials Ordering / Finishes | 8–16 weeks for custom items | Order cabinets, windows, and appliances before demolition starts |
| Unexpected Discoveries | Demolition / Rough-In | Several days to weeks | Allocate a 10–20% emergency fund and time buffer |
| Weather Conditions | Site Prep / Framing | Days to weeks (seasonal) | Build in a weather buffer for exterior work |
| Failed Inspections | Rough-In / Final Touches | 1–2 weeks per instance | Conduct a mock inspection 24–48 hours before the official review |
| Change Orders | Any Phase | Variable; requires re-sequencing | Freeze the project scope before construction begins |
To keep your renovation on schedule, finalize all material choices – like paint colors, hardware, flooring, and fixtures – before demolition begins. Experts also advise adding a 20% to 30% contingency buffer to both your timeline and budget. Weekly check-ins with your contractor can help address minor issues early, preventing them from turning into major setbacks.
Renovation timelines can vary greatly depending on the size and complexity of the project. For example, a typical bathroom remodel might take anywhere from 3 to 6 weeks, while a kitchen renovation could stretch to 6 to 10 weeks. If you’re tackling a whole-house renovation, you might be looking at 4 months to over a year, with extensive gut renovations taking as long as 12 to 24 months. These estimates assume everything goes smoothly – materials arrive on time, planning is thorough, and surprises are kept to a minimum.
Proper preparation is key to keeping your project on track. As discussed earlier, taking time to plan carefully with a checklist, ordering materials with long lead times early, and securing any necessary permits before breaking ground can help you avoid major delays. It’s also smart to include a 20% to 30% buffer in both your timeline and budget. This extra cushion can help cover unexpected issues like failed inspections, bad weather, or hidden structural problems. Regular check-ins with your contractor can also help catch and resolve small issues before they become major roadblocks.
The ideal time to order long-lead items is during the planning stage, right after the design has been approved. This approach ensures that materials arrive when needed, helping you avoid unnecessary delays in your renovation project.
To prevent inspection delays, make sure all utilities – electricity, water, and gas – are turned on before the inspector arrives. Key areas like the attic, crawl space, and electrical panels should also be cleared, unlocked, and easy to access. Preparing these spaces in advance can save time and hassle.
It’s also smart to schedule inspections early and take the time to ensure everything meets the necessary standards. A little preparation and organization can go a long way in keeping your renovation on schedule and avoiding avoidable setbacks.
When deciding whether to stay in your home during a whole-house renovation, it all comes down to the scope of the project. If the work involves major structural changes, electrical upgrades, or plumbing overhauls, moving out temporarily is usually the safer and more practical choice. On the other hand, for smaller, less intrusive phases, staying might be manageable – especially if you take steps to minimize dust and noise.
Your safety, comfort, and the project timeline should guide your decision. Make sure to discuss your options with your contractor, as they can provide advice specific to your situation.