New! DIY Project Planner. Plan smarter, skip the spreadsheets. Start Your Free Trial Today →

Smart DIY & Home Improvement Tips
Smart DIY & Home Improvement Tips
Post-install cabinet inspection checklist: tools, alignment, anchoring, hardware, finish checks, and punch-list tips to catch issues before countertops.
Cabinet installation can cost between $80 and $190 per cabinet, making it a significant investment. A thorough inspection right after installation helps avoid costly repairs and delays. Here’s how to check if your cabinets are properly installed:
Pro Tip: Document issues with photos and create a punch list for your installer to address before signing off. Spotting problems early can save you time and money.
Keep reading for a detailed guide on how to inspect your cabinets step by step.
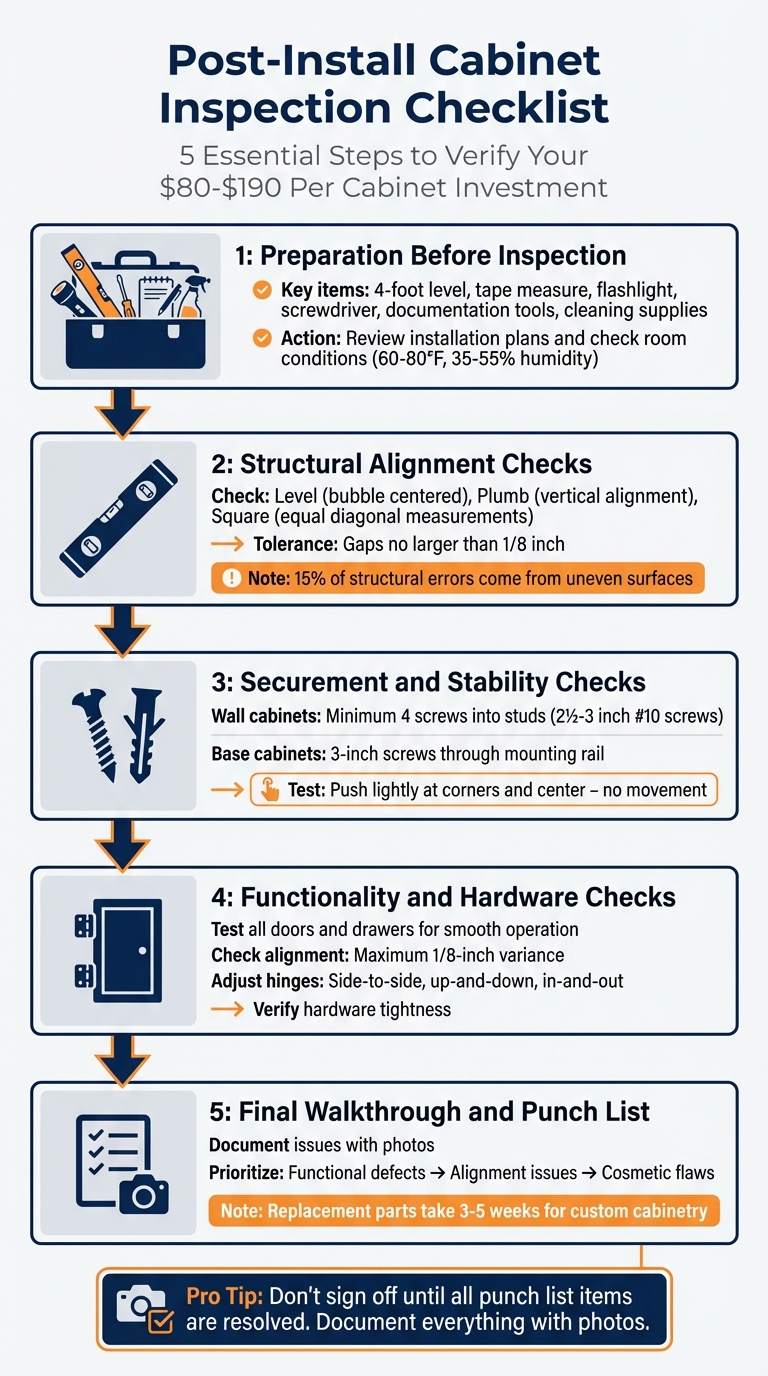
5-Step Cabinet Inspection Checklist: From Preparation to Final Walkthrough
Getting ready is the first step to ensuring a thorough cabinet inspection. Without proper preparation, you risk overlooking critical details that could lead to costly issues later on.
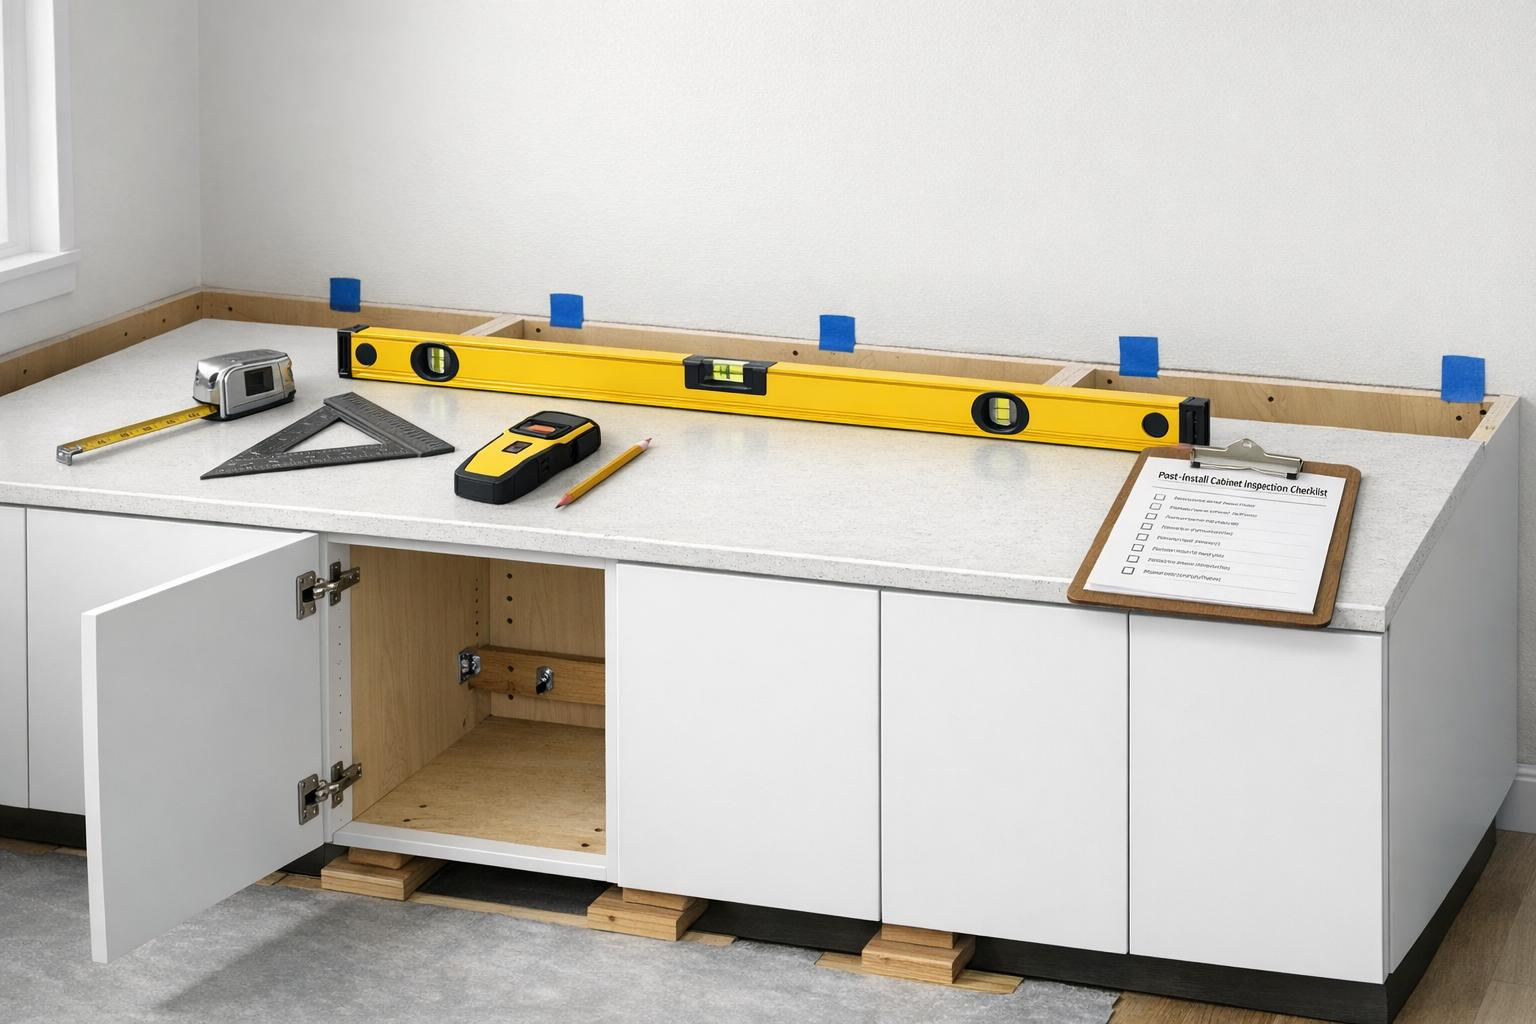
Start by assembling everything you’ll need for the inspection. Here’s a handy list:
Once you’ve gathered your tools, you’re ready to move on to verifying that the cabinets align with your installation plans.
Now, compare the installed cabinets to your original layout. Double-check everything: cabinet counts, sizes, colors, door orientations, hardware alignment, filler strip placements, and appliance clearances. Use your tape measure to confirm that openings for the dishwasher, sink, and stove are accurate.
"They [cabinets] should be straight, level, and properly anchored to the wall. They should all line up evenly with one another as well as the appliances."
– Mike Holmes, Contractor and TV Host
Don’t forget to inspect the smaller details. Ensure HVAC vents are cut correctly and that electrical outlets meet safety standards. For example, outlets within 6 feet of the kitchen sink must have GFCI protection.
Once you’ve confirmed the layout, take a moment to assess the room’s overall conditions. These can directly impact the performance of your cabinets.
Wood cabinets are sensitive to their environment, especially humidity and temperature. Too much humidity can cause the wood to swell, while too little can lead to shrinkage. Aim to maintain a room temperature of 60–80°F and a humidity level between 35–55% for at least 72 hours. Use a digital hygrometer to check these levels.
If the humidity is too high (70–80%), you might notice swelling. On the other hand, levels below 20% can cause shrinkage. Sometimes, what looks like an installation issue may simply resolve itself as the cabinets acclimate to the room.
"Most changes in wood appearance result from improper humidity conditions during site storage, installation or actual use of the cabinetry."
– Diamond Cabinets
Once you’ve verified the room and tools, it’s time to ensure the cabinets meet structural standards. Proper alignment is the backbone of any professional installation. If cabinets aren’t level, plumb, and square, you’ll likely face issues with doors, drawers, and even countertops down the road.
Start by checking if the cabinets are level. Use a 4-foot level and measure horizontally across the front and front-to-back. For longer cabinet runs, place the level across multiple units to check the entire span – the bubble should rest perfectly in the center of the vial. To confirm they’re plumb, hold the level vertically against the cabinet’s face and sides. A properly plumb cabinet will stand straight without tilting forward or back.
Next, test for squareness. Measure diagonally across the cabinet openings – both measurements should be equal. Alternatively, use a carpenter’s square to confirm the corners form 90-degree angles.
Once the alignment checks are complete, shift your attention to the individual cabinet units.
Base cabinets should be level in every direction. Check visually to ensure the stiles (vertical frame pieces) align evenly. Misalignment often signals the need for shimming. For wall cabinets, confirm that they are installed with consistent reveals (the visible edge of the face frame) and overhangs. Typically, the space between the countertop and the bottom of wall cabinets should measure 18 inches.
| Measurement Type | Tool Used | Target Condition |
|---|---|---|
| Level | 4-ft or 6-ft Level | Bubble centered side-to-side and front-to-back |
| Plumb | 4-ft Level | Bubble centered vertically against face/sides |
| Square | Tape Measure/Square | Equal diagonal measurements; 90° corners |
It’s worth noting that uneven surfaces are responsible for about 15% of structural errors, which can increase repair costs by as much as 20%.
Once the structure is verified, examine how the cabinets fit against walls and floors.
Scribing is a technique used to adjust cabinets to the contours of uneven walls or floors while keeping the front face level. Check for tight scribing – gaps should be no larger than 1/8 inch. This same tolerance applies to the alignment of doors and drawers.
If you encounter larger gaps, first confirm the cabinet is plumb; sometimes, the problem lies with the walls themselves. For vertical gaps, scribe molding can help, while horizontal gaps are best addressed with shoe molding. Apply caulk to seal any remaining spaces to prevent moisture-related damage. Proper scribing not only improves the appearance but also protects the installation from water damage.
For corner installations, ensure filler strips leave enough clearance – typically around 2.5 inches – to allow doors and drawers to open fully without hitting walls or nearby hardware. Test the range of motion for all doors and drawers before finalizing the installation.
Even if your cabinets are perfectly aligned, they can fail without proper anchoring. Securement ensures your cabinets stay firmly in place, preventing them from pulling away from walls, tipping forward, or collapsing under the weight of daily use. This critical step ensures your installation can handle heavy loads and regular activity without wobbling or shifting.
Once alignment is confirmed, it’s time to check that wall cabinets are securely anchored to keep them stable.
Wall cabinets bear significant weight, so they need to be attached with at least four screws directly into wall studs: typically, two in the top mounting rail and two in the bottom rail. Use 2½-inch to 3-inch #10 washer-head cabinet screws, as these provide better holding power compared to standard drywall screws, which aren’t strong enough for heavy loads.
"Push the cabinets lightly to test their attachments to the wall. The cabinets should feel stable and strong at every point of connection." – The Home Depot
When testing, apply light pressure to the corners, center, top, and bottom of the cabinet. If you notice any movement or back-bowing (a slight inward curve), you’ll need to make adjustments. Loosen the screws, insert shims at stud locations for support, and then retighten. These shims help prevent the cabinet box from warping as the screws are tightened. If a cabinet can only reach one stud, reinforce it with at least two screws into that stud and consider using toggle bolts for additional support. Avoid attaching heavy cabinets directly to drywall, as this won’t provide adequate stability.
Base cabinets require secure anchoring to both the wall and each other. Attach each unit to wall studs using 3-inch #10 screws through the mounting rail. To create a stable, continuous structure, connect adjacent cabinets by fastening their face frames together – not their side panels. Use at least three screws (top, middle, and bottom) for this step. This method prevents gaps from forming over time and ensures the entire cabinet run functions as a single, rigid unit.
To check stability, gently push on the cabinet fronts and corners. If there’s any wobble, it’s a sign of insufficient anchoring. For freestanding units like kitchen islands, make sure they’re fastened securely to the floor with the appropriate hardware to prevent movement. Tall pantry cabinets, which carry heavy loads, need multiple wall anchors to remain stable.
In addition to anchoring, base cabinets and their accessories, like toe kicks, must provide consistent and level support.
Ensure the base cabinets are level to within 1/8 inch over an 8-foot span. Uneven cabinets can cause heavy countertops, such as granite, to crack due to insufficient support.
"The counter top company will expect the cabinets to be level to within 1/8" over 8′. If this is not done, there will be excessive shimming of the counter tops and, if granite, you risk the counter cracking due to the voids/humps under the counter top." – Cabinet Joint
Pay attention to the toe kicks – the 3½-inch molding at the base of the cabinets. Check for gaps between the molding and the floor. Uneven flooring may leave visible gaps, which can be covered with shoe molding and sealed with caulk to protect the cabinet base from moisture damage. Also, trim any shims flush with the cabinet edges, ensuring the cabinets rest firmly on the highest point of the floor, not on a sloped surface.
Once you’ve ensured structural stability, it’s time to test every moving component to confirm everything operates smoothly.
Open every door and drawer completely, checking that they move freely without hitting walls, appliances, or neighboring units. Doors should swing open easily, and drawers should slide effortlessly. If a drawer feels uneven or jerky, it could indicate an issue with the ball bearings. Also, check that all doors and drawer fronts align perfectly, with no more than a 1/8-inch variance.
"The doors and drawers in your kitchen should not rub up against or bump one another or any of the appliances nearby." – Mike Holmes
Close each door slowly to ensure it seals properly. If a door pops back open slightly, you may need to adjust the hinges or install a magnetic or roller catch. For drawers, confirm they stay on their tracks securely, without wobbling or misalignment.
Once you’ve tested their movement, focus on fine-tuning the hinges and mechanisms to keep everything functioning smoothly.
Check that all four screws on each hinge – two on the door and two on the cabinet frame – are tightened. Loose screws can lead to sagging doors. If adjustments are needed, most modern concealed hinges allow for three-way fine-tuning using a #2 Phillips-head screwdriver:
Make small, quarter-turn adjustments and test after each one. For drawers, locate the plastic adjustment piece on the clips under the drawer box to adjust height, and rotate the plastic wheels to align the drawer face. To prevent squeaking, apply a few drops of silicone-based lubricant to the hinge’s moving parts every few months.
After adjusting the hinges, double-check that all external hardware is secure.
With structural and functional checks out of the way, it’s time to focus on the cosmetic details of your installation.
Take a close look at panels and doors for any scratches, dents, or blemishes. Running your hand over the surfaces can help you detect hidden gouges or imperfections. Check the finish for consistent color and ensure there’s no puddling, runs, or drips in the coating.
Confirm that cabinet and door colors align with your project specifications and match each other. While slight color variations are typical for natural wood, noticeable differences between adjacent units may need further investigation. Look closely around screw holes for splintered wood and verify there are no unfilled holes or stray fasteners on visible surfaces. For doors, perform the bump stop test – if a door only makes contact at one point instead of both the top and bottom stops, it could indicate warping.
Check that scribe molding properly hides any vertical gaps between cabinets and walls. At the base, ensure the shoe molding neatly bridges gaps between the cabinets and the floor. Make sure crown molding, end panels, and light rails are securely attached without visible gaps or misalignments. Running your hand over trim surfaces can help you identify poorly concealed nails or tacks. Also, confirm that kick plates are installed tightly without gaps or holes and that molding around vents fits properly. These finishing touches ensure a polished look.
Inspect plumbing and electrical cut-outs to ensure their edges are clean and free of splinters. Run your hand along these edges to check for snags or sharp fasteners that could pose a safety hazard. Make sure electrical outlets are flush with the surface and properly aligned. Finally, wipe down cabinet interiors with a damp cloth to remove dust or debris, leaving them ready for use.
Once all cosmetic and structural details are in place, it’s time for a thorough final evaluation of the installation to ensure everything matches the specifications.
Take photos of every issue you spot – whether it’s scratches, loose hardware, misaligned doors, or gaps in trim. Visual documentation is essential. As Tim Vargas emphasizes in his New Home Walk Through Guide, "The ‘small things’ usually turn into bigger things, and failing to point them out and have them corrected could be a costly mistake". Use painter’s tape to mark minor defects, making it easier for contractors to locate them. Your written punch list should detail the location of each issue, include a brief description, and reference the corresponding photo. Don’t finalize sign-off until a follow-up confirms all punch list items are resolved.
Having a clear record of issues allows you to address them systematically.
Not every problem demands immediate attention. Start with functional defects, like unstable cabinets, binding drawers, or misaligned doors – these impact safety and usability. Next, focus on alignment issues that could delay future work. For instance, if countertops are scheduled for installation next week, the cabinets must be properly aligned first. High-visibility cosmetic flaws, like imperfections at eye level in the kitchen, should take precedence over less noticeable issues, such as small dings near the floor of a pantry. Be aware that replacement parts for semi-custom or custom cabinetry can take 3 to 5 weeks to arrive, so identify those needs as soon as possible. To save time and money, group fixes by trade – for example, schedule all electrical adjustments together and all hardware fixes in another session.
Revisit your installation plans to ensure the space matches the original design. Count the cabinets, verify their sizes, and confirm the layout. Inspect the face frames from multiple angles – not just straight-on – to catch subtle alignment problems. Check that all details reflect the intended design, such as consistent door reveals and uniform placement of hardware. Run your hand over surfaces to catch bumps or paint drips that might escape visual inspection. The goal is a cohesive, polished installation with symmetrical spacing and balanced proportions throughout the room.
Countertop installation needs to stop immediately if the cabinets are not level or plumb. Uneven cabinets can cause gaps, instability, or even stress fractures in the countertop over time. Similarly, if the cabinets are damaged or poorly installed, falling short of quality standards, these issues must be fixed before moving forward with the installation.
Cabinet gaps can often be traced back to two main causes: humidity changes or poor installation. Here’s how to tell the difference:
By observing how the gaps behave across different seasons, you can better identify the root of the problem.
Before wrapping up your cabinet installation, take a moment to ensure everything is in perfect order. Check that all cabinets are level, plumb, and securely fastened. Test the doors and drawers to make sure they open and close smoothly, and confirm that all hardware is properly aligned. Look for any damages, unfilled holes, or imperfections.
Also, verify that shelves, moldings, and kick plates are installed correctly, and double-check that any cutouts for vents or plumbing are accurate. If you notice anything that needs attention, document it. Finally, inspect the finish to make sure it meets your expectations.