New! DIY Project Planner. Plan smarter, skip the spreadsheets. Start Your Free Trial Today →

Smart DIY & Home Improvement Tips
Smart DIY & Home Improvement Tips
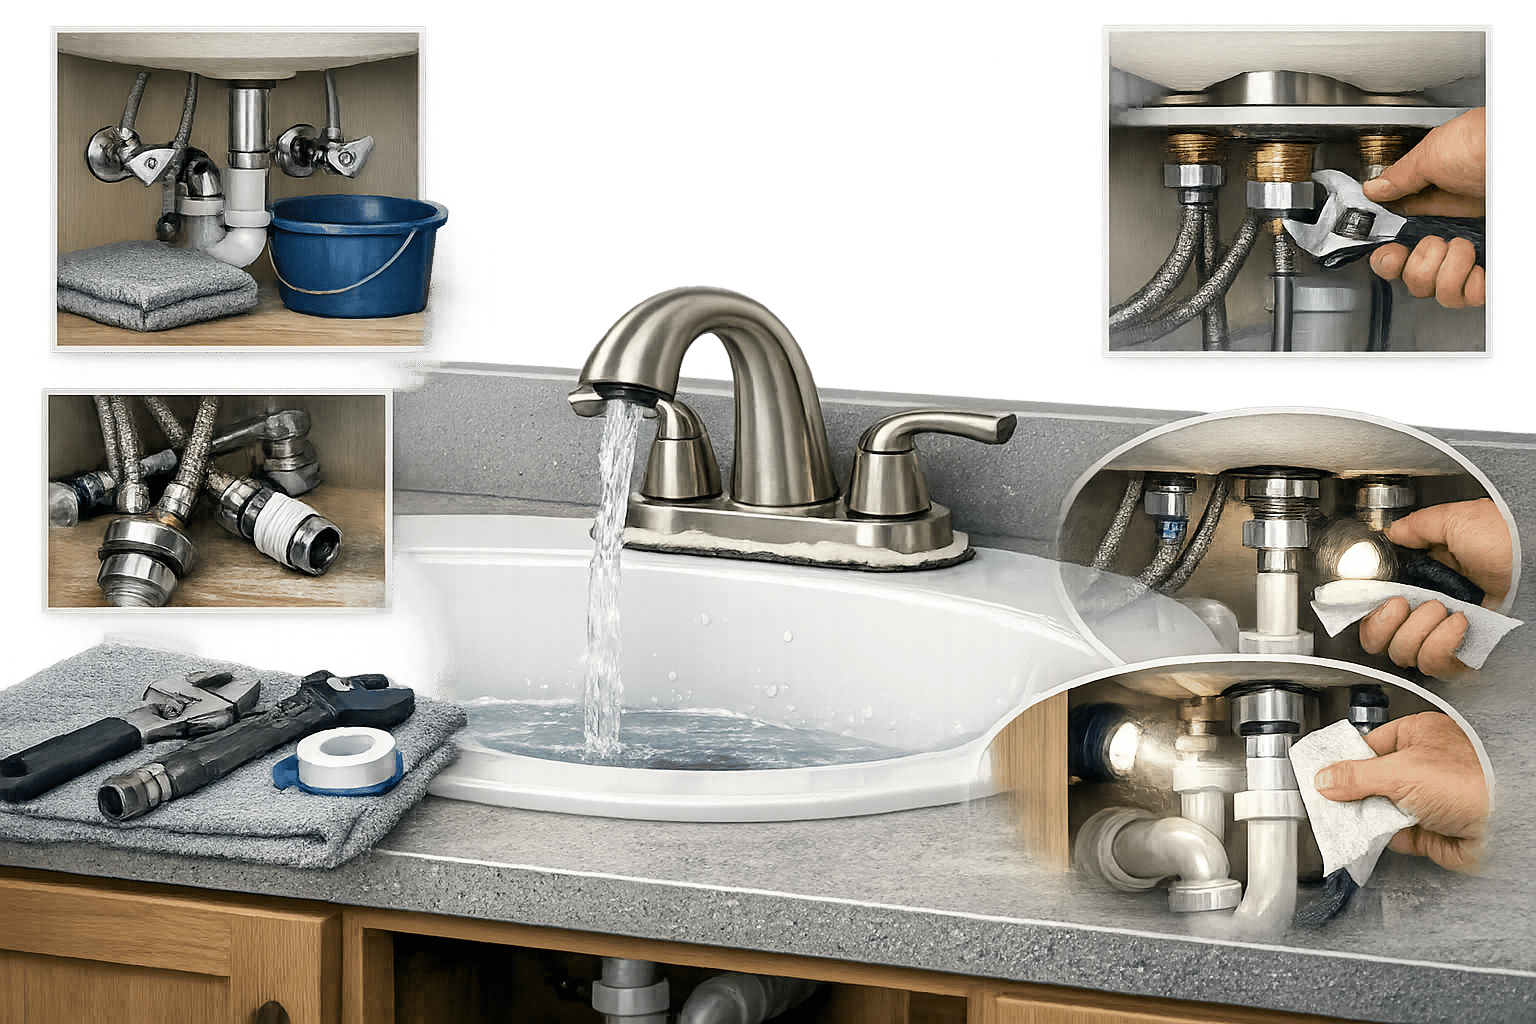
Step-by-step DIY guide to replace a bathroom faucet in 1–2 hours, covering tools, shutoff, mounting, supply-line connections, flushing, and leak checks.
Replacing a bathroom faucet is easier than you might think, and it can save you up to $450 in labor costs. With just a few basic tools and about 1–2 hours, you can handle this project yourself – no plumber required. Here’s what you’ll do:
You’ll need tools like an adjustable wrench, screwdriver, basin wrench, and materials like plumber’s tape and possibly new supply lines. A clean sink and careful alignment ensure a watertight seal. By following these steps, you’ll have a new faucet installed and working in no time.

5-Step Bathroom Faucet Installation Process Guide
Having everything ready before starting will save you from unnecessary trips to the hardware store. A few key tools and materials can make the process much smoother.
An adjustable wrench is essential for handling supply line connections, and a Phillips-head screwdriver will help secure the mounting hardware. Keep a bucket and some rags or towels nearby to catch any leftover water when disconnecting old lines.
A basin wrench is a lifesaver for reaching mounting nuts in tight spaces. A putty knife will help scrape away old sealant or mineral deposits from the sink surface. If you’re dealing with an older faucet, a spray of WD-40 or similar penetrating oil can loosen corroded nuts – just give it about 15 minutes to work its magic before you start.
Most new faucets come with the essential components, but it’s wise to invest in new braided stainless steel supply lines. Even if your old lines seem fine, they should be replaced every 5 to 7 years to avoid leaks or potential flooding.
You’ll also need plumber’s tape (Teflon tape) to seal threaded connections and prevent leaks. For the faucet base, check if your faucet includes a gasket. If it does, you can skip additional sealant. If not, use either plumber’s putty or silicone sealant. Plumber’s putty is easier to handle and clean, but avoid using it on natural stone surfaces like marble or granite, as it can cause staining.
If you’re installing a single-hole faucet in a sink with three holes, make sure your faucet kit includes a deck plate (also called an escutcheon) to cover the extra holes.
Once you’ve gathered all your tools and materials, you’re ready to prep your workspace and shut off the water supply.
Start by emptying the cabinet beneath your sink. Remove anything stored there – cleaning supplies, toiletries, bins – so you have enough room to access the mounting hardware easily. Before disconnecting any plumbing, take a quick photo of the setup. This snapshot will be a handy reference when it’s time to reassemble everything.
Spread out a drop cloth to catch any drips, and place a bucket under the supply lines to collect water. If the space is dim or cramped, grab a flashlight or an LED swivel light to illuminate those hard-to-see areas, like the upper corners where mounting nuts might be hiding.
Once the area is cleared and ready, it’s time to safely shut off the water supply.
Find the hot and cold water shutoff valves directly under the sink. Turn both valves clockwise to close them. Then, open the faucet to release any built-up pressure and confirm the water flow has completely stopped. Keep your bucket in place to catch any leftover water from the lines.
"If the water doesn’t stop flowing completely, your shut-off valves might be faulty and need replacing before you can proceed." – Sensible Digs
If water continues to flow after closing the valves, you may need to shut off your home’s main water line. This is a common issue in older homes due to worn-out shutoff valves, so it’s best to address this problem before moving forward with your faucet installation.
Once the water is completely off and there’s no residual flow, you’re ready to tackle removing the old faucet.
Once your workspace is ready and the water is shut off, it’s time to remove the old faucet. By following these straightforward steps, you can avoid common challenges and ensure a smoother replacement process.
Start by locating the supply line connections under the sink. Use a flashlight to clearly see where they attach to the faucet tailpieces. With an adjustable wrench, turn the coupling nuts counter-clockwise to loosen them. Remember, since you’re working upside down, the direction might feel opposite. Keep a bucket handy to catch any water that may leak out during this step.
If the nuts are difficult to loosen, use one set of pliers to hold the valve body steady while using another tool to turn the nut. This prevents the plumbing from twisting or getting damaged. For connections that are corroded or stuck, apply a penetrating oil like WD-40 and let it sit for 5 to 15 minutes before trying again. If your braided supply lines are showing signs of corrosion or are older than 5–7 years, consider replacing them during the new faucet installation.
Next, remove the mounting nuts that secure the faucet to the sink. A basin wrench is your go-to tool here. It’s designed to reach into the tight space behind the sink and grip the nuts effectively. Adjust the wrench to fit the mounting nut and turn it counter-clockwise to loosen.
"If the mounting nuts will not come off, apply penetrating oil and allow it to sit for a few minutes, then try again." – Aaron Stickley, Licensed Plumber
If the nuts remain stuck, apply more penetrating oil and wait a few minutes before reattempting. For severely seized nuts, let the oil sit longer and carefully brush away any rust. In extreme cases where the nuts are stripped or completely frozen, you may need to cut them off using a hacksaw or a nut-splitter tool. Be careful to avoid damaging the sink in the process. Once the mounting hardware is removed, lift the old faucet straight out. After that, clean the sink surface thoroughly to prepare for the new faucet.
Before installing the new faucet, make sure the sink deck is spotless and dry. Use a plastic putty knife to scrape away old putty, silicone, or mineral deposits around the mounting holes. Avoid metal tools, as they can permanently scratch the sink’s finish.
Wash the area with soapy water and a sponge to remove any remaining residue. Then, wipe it down with rubbing alcohol or an all-purpose cleaner to get rid of oils and debris. Rinse thoroughly with clean water, dry the area with a rag, and let it air-dry completely. A clean, smooth surface is essential to ensure the new faucet’s gasket or putty forms a watertight seal.
With your sink clean and dry, it’s time to install the new faucet. Proper positioning at this stage is key to avoiding leaks and ensuring smooth water flow. Take your time to position and secure the faucet with even, gradual tightening.
Start by preparing the mounting area. Check if your faucet comes with a rubber or plastic gasket. If it doesn’t, apply a 1/4-inch bead of plumber’s putty or silicone caulk around the base. This step helps create a watertight seal.
Carefully insert the faucet through the sink’s mounting holes, keeping the base aligned parallel to the back edge of the sink. If your faucet includes a lift rod for the drain stopper, ensure the hole for the rod faces directly toward the back of the sink. To prevent the faucet from shifting, have someone hold it steady from above while you work underneath.
Under the sink, slide the rubber washer onto the tailpieces first, followed by the metal friction washer. Then, thread on the mounting nuts by hand. Tighten the nuts evenly by hand before using a basin wrench to give each side an extra quarter-turn. Be cautious not to overtighten, especially with porcelain sinks, as too much pressure can cause cracks.
"Be careful not to overtighten, as this could damage the sink’s porcelain." – Gregory Nemec, This Old House
Once the faucet base is secure, check its alignment from above. Measure the distance from each side of the faucet body to the edges of the sink to confirm it’s centered. The spout and handles should sit straight and not appear misaligned with the sink basin.
For faucets with multiple handles, adjust them so they face the sides when in the "off" position and point forward when "on." Once aligned, tighten the set screws to lock them in place. Also, double-check that the gasket or baseplate remains properly seated as you tighten from below. Ensuring everything is aligned now will save you from headaches later.
Start by wrapping plumber’s tape around the male threads of both the shut-off valves and the faucet fittings. Make sure to wrap it clockwise so it stays secure.
Hand-tighten the supply line nuts onto the faucet tailpieces, then use an adjustable wrench to give each a final quarter-turn for a snug fit. When connecting the supply lines to the shut-off valves, hold the valve steady with one wrench while tightening the nut with another. This prevents the valve from twisting, which could damage the pipe inside the wall.
Be cautious not to overtighten, as this could crack plastic nuts or strip the threads. If the supply lines are longer than needed, loop them gently to avoid creating sharp kinks.
Once everything is connected, it’s time to flush the system and check for leaks.
Before turning the water back on, remove the aerator from the faucet by unscrewing it counterclockwise. Slowly open the shut-off valves and run both the hot and cold water for one to five minutes. This helps flush out any debris or sediment left from manufacturing that could clog the aerator or damage the faucet’s internal parts.
When flushing is complete, turn off the faucet and reattach the aerator. Carefully inspect all connection points, including the supply lines at the shut-off valves, the faucet shanks, the faucet base, and the drain assembly. Use a flashlight to check harder-to-see areas at the back of the cabinet. While the water is running, wipe each joint with a dry tissue to spot any drips.
If you find a leak at a threaded connection, disconnect it, clean the threads, reapply Teflon tape (again, wrapping clockwise), and retighten.
With your faucet now installed and functioning smoothly, here are a few tips to keep it in top shape for years to come. You’ve tackled the toughest part of the job – as retired plumber Peter Gray puts it, "The most difficult part is usually removing the old, corroded faucet rather than installing the new one". Plus, by doing it yourself, you’ve saved anywhere from $150 to $450 in labor costs. Your new faucet should deliver reliable performance for up to 20 years.
To keep it looking and working like new, clean the faucet regularly using a soft cloth and mild soap, steering clear of abrasive cleaners. For mineral buildup, a simple mix of water and white vinegar (equal parts) works wonders. Every few months, check the connections under your sink and tighten them if needed. If you chose an EPA WaterSense certified faucet, you’ll also benefit from at least 20% less water usage without compromising performance.
The skills you’ve gained – like using a basin wrench and sealing threaded connections – will come in handy for future DIY projects. You’ve proven you can take on plumbing tasks with confidence and precision.
When installing a new faucet, it’s important to confirm the number of holes in your sink and measure the distance between them. Sinks typically come with 2, 3, or 4 holes, and standard spacing is often 4 or 8 inches. Most faucets are built to fit these common configurations. However, if your sink doesn’t align with these standards, you might need a baseplate or extra fittings to ensure everything fits properly.
If your shutoff valves aren’t completely stopping the water flow, try turning them back and forth a few times. This can help dislodge any debris or mineral buildup that might be causing the problem. If the valves remain stuck, grab a pair of pliers or an adjustable wrench and carefully turn the valve – just be sure not to use too much force to avoid damaging it. To avoid this issue down the line, make it a habit to periodically turn your valves on and off to keep them in good working order.
Use plumber’s putty for indoor projects where a removable seal is needed, like under faucet bases or around sink drains. It’s perfect for situations where adjustments or future removal might be necessary. On the other hand, silicone works best for permanent seals in high-moisture or outdoor areas. It creates a strong, waterproof barrier that stands up to water, heat, and chemicals. Silicone is especially suited for sealing around the entire faucet base in consistently wet environments.