New! DIY Project Planner. Plan smarter, skip the spreadsheets. Start Your Free Trial Today →

Smart DIY & Home Improvement Tips
Smart DIY & Home Improvement Tips
Fix under-sink leaks quickly: locate the source, tighten or replace fittings, use epoxy or silicone tape for temporary fixes, then test thoroughly.
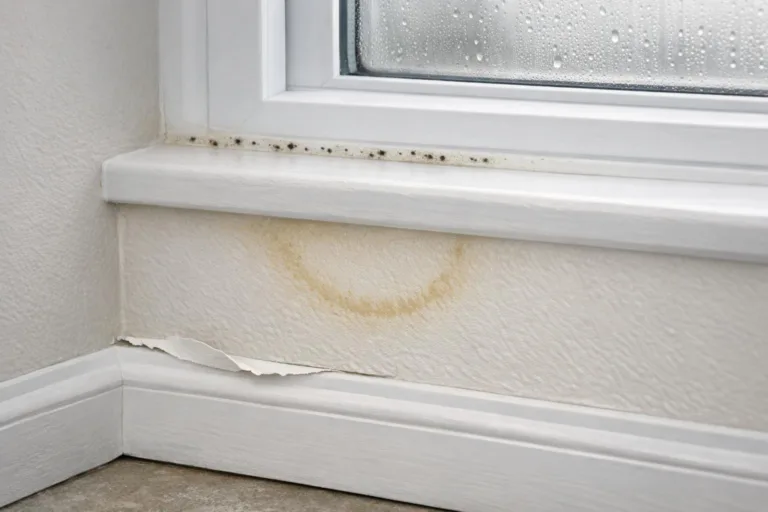
A leaky pipe under your sink can cause serious damage if ignored – warped cabinets, mold, and even costly repairs in multi-unit buildings. The good news? Most leaks are easy to fix with basic tools and a little guidance. Here’s what you need to know:
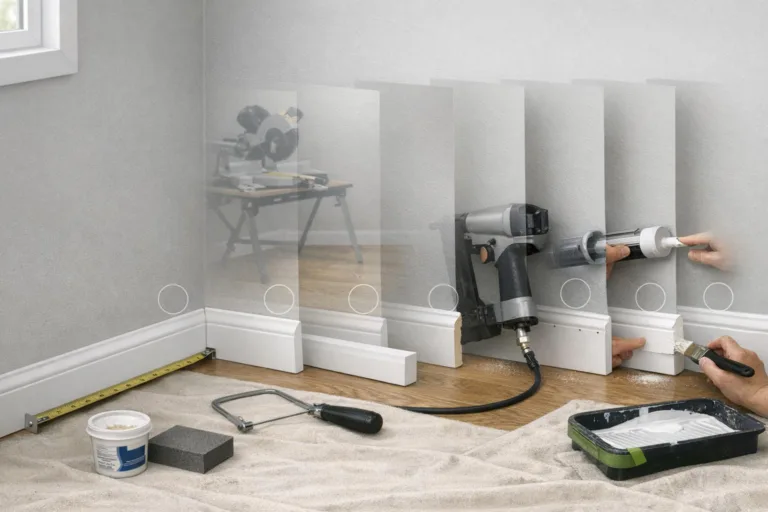
Most repairs take 30–60 minutes and cost far less than hiring a plumber. Acting quickly can save you from bigger problems down the line.
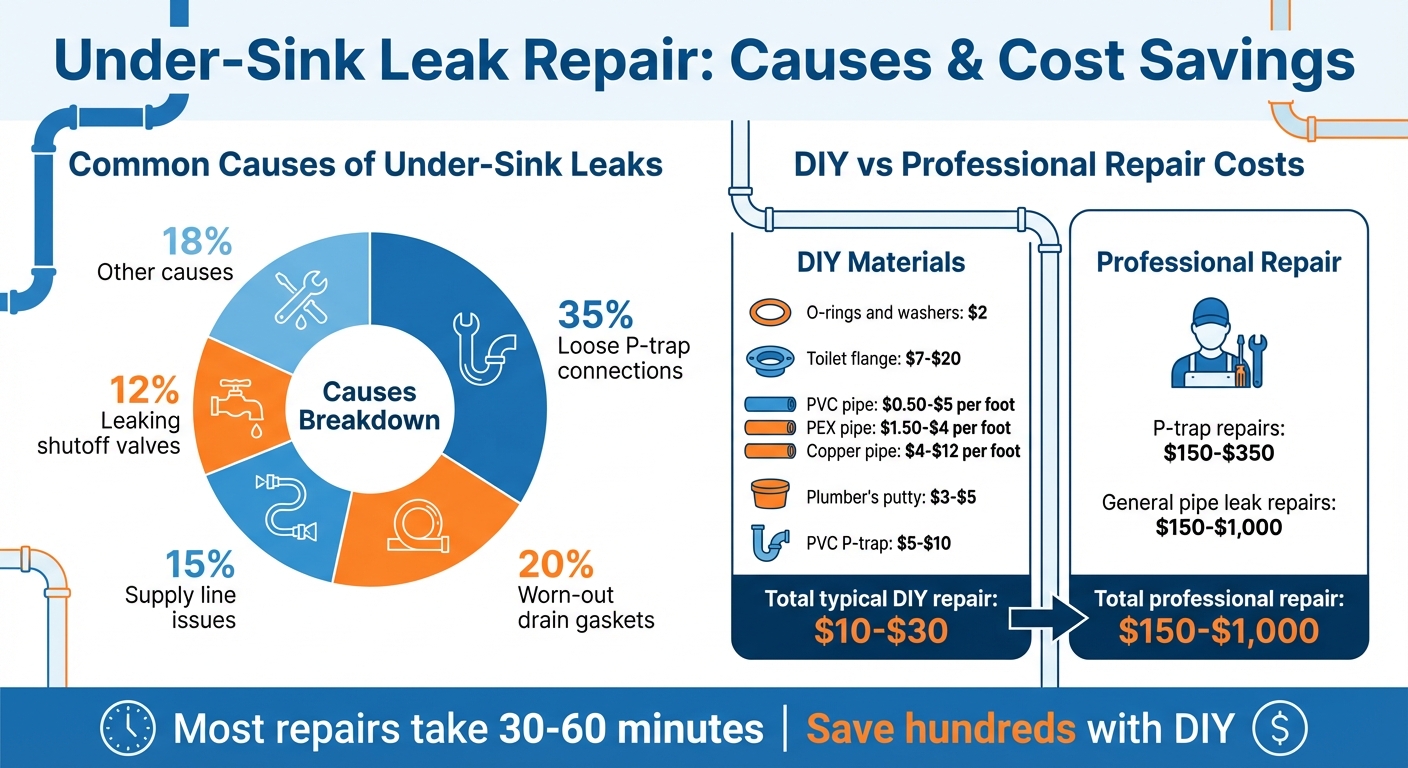
Common Causes of Under-Sink Leaks and DIY Repair Cost Comparison
Before tackling repairs, it’s essential to gather all the tools and materials you’ll need. This preparation ensures the process goes smoothly and saves you from making unnecessary trips to the store. You’ll need an adjustable wrench, slip-joint pliers, a screwdriver, and a flashlight. A wire brush or sandpaper is also helpful for cleaning pipe surfaces before applying sealants or putty. Here’s a closer look at what you’ll need for a successful repair.
The tools required are simple and budget-friendly. An adjustable wrench works for most nuts and fittings, while slip-joint pliers provide the grip needed for P-trap connections. A flashlight is crucial for illuminating hard-to-see areas. Don’t forget to position a bucket under the pipes to catch any water and have rags or paper towels handy to dry surfaces, which helps sealants adhere properly.
For quick, temporary fixes, you’ll want items like self-fusing silicone tape, epoxy putty, and pipe clamps. Steer clear of duct tape – it’s not waterproof and won’t hold up against water pressure. For permanent repairs, stock up on plumber’s tape (Teflon tape), replacement nylon washers, O-rings, braided supply lines, and complete P-trap assemblies if needed. Often, leaks are caused by worn nylon washers inside slip joints, so check these first before replacing entire pipes.
DIY repairs are much cheaper than hiring a professional. For example, O-rings and washers cost around $2, and a toilet flange ranges from $7 to $20. If replacing pipe sections, PVC runs $0.50–$5 per foot, PEX costs $1.50–$4 per foot, and copper ranges from $4 to $12 per foot. Compare that to professional repair costs, such as $150–$350 for P-trap repairs or $150–$1,000 for general pipe leak repairs, depending on the complexity and accessibility. Most of these materials are available at local hardware stores, so you can avoid waiting for shipping.
Once you’ve gathered everything, you’re ready to move on to preparing your work area safely and efficiently.
Before diving into repairs, it’s crucial to set up a safe and organized workspace. Start by clearing out everything under the sink. This not only gives you room to work but also exposes any hidden leaks. Remember, water left unchecked can weaken the cabinet floor over time.
Find the shut-off valves near your sink and turn them clockwise until they stop. If you notice the valve leaking, refusing to close, or if the pipe shows signs of corrosion, it’s time to call in a professional.
Take a moment to dry off all pipes, joints, and surfaces using paper towels. This helps you tell the difference between old moisture and fresh leaks. Once that’s done, line the cabinet floor with dry paper towels or newspaper. Place a bucket under the P-trap or supply lines to catch any leftover water. With a dry, clear workspace and tools ready, you’ll be set to locate the source of the problem.
Don’t forget to wear gloves to protect your hands from sharp edges or debris. A flashlight is also essential for spotting leaks in tight, dark spaces. Once your area is prepped, most under-sink fixes should take about 30 to 60 minutes to complete.
Once your workspace is dry and ready, the next step is figuring out where the water is coming from. Start your inspection at the highest point where the pipes connect to the sink basin. Since water naturally flows downward, leaks from higher connections can trick you into thinking the problem is at a lower joint.
Run water through the sink for two to three minutes while carefully observing the plumbing. Use a dry towel to wipe down each connection – this can help you spot moisture that might otherwise be hard to see on the pipes themselves. Pay extra attention to slip-joint connections on the P-trap and drain lines, as these are common trouble spots.
"Most kitchen sink leaks are on the drain lines (very frequently on loose or improperly connected slip joint connections). These won’t show themselves unless you’re running water." – Legacy Plumbing
For a more thorough test, fill both sink basins completely with water. Then, pull the stoppers simultaneously while running the garbage disposal. This creates maximum water pressure, making it easier to spot leaks that only occur under heavy flow. Use the edge of a paper towel to check tight spaces around slip nuts and U-bends where water might be hiding. Once you’ve inspected the connections, shift your attention to checking for physical damage.
While the water is running, examine the pipes for any visible damage. Look for signs like white mineral deposits, rust on metal parts, or green oxidation – these often indicate a slow, long-term leak. If you notice these signs but don’t see active dripping, the leak might be intermittent. In areas with poor visibility, like behind the basin, feel along the underside of the pipes for fresh moisture.
For leaks that only happen occasionally, try placing a baking tray or a water alarm under the plumbing and monitor it over a few days of regular use. Once you’ve pinpointed the source of the leak, you’re ready to move on to choosing the best repair method.
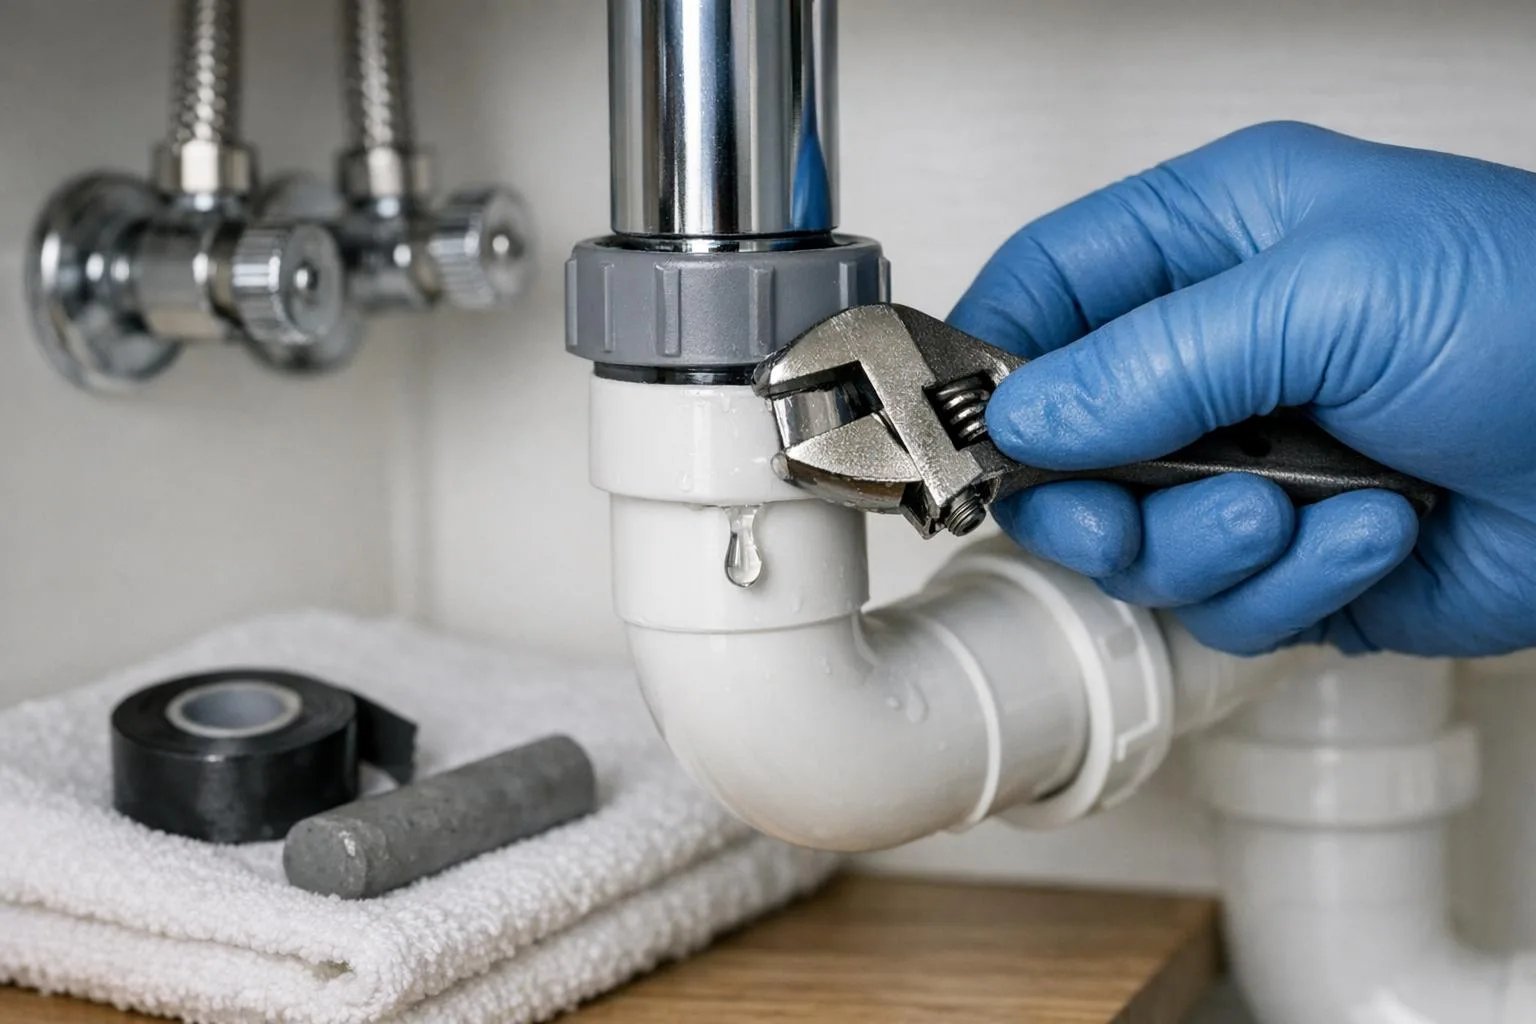
Once you’ve identified the source of the leak, it’s time to pick the right method to fix it. Most under-sink leaks fall into a few categories, and each one requires a specific approach.
Start by hand-tightening the slip nut as much as possible. Then, use slip-joint pliers or an adjustable wrench to give it an additional 1/16 to 1/4 turn. Be cautious – overtightening can damage threads or fittings.
"If it leaks at hand-tight plus a quarter turn, the washer is the problem, not the tightness." – Ryan Pietrzak, Licensed Plumber
If tightening doesn’t stop the leak, unscrew the nut and inspect the slip-joint washer. Make sure the tapered side is facing the pipe connection for a proper seal. Replace the washer if it’s worn, cracked, or hardened (a multi-pack costs about $1–$2). For metal pipes, wrap plumber’s tape (Teflon tape) around the threads before reassembling. Avoid using tape or pipe dope on plastic or PVC threads. If the leak continues, it may be time to address damaged components.
If the leak is coming from the sink drain interface, here’s what to do: Unscrew the locknut under the sink and remove the old basket strainer flange. Clean off any old putty from the sink opening and flange. Roll a rope of fresh plumber’s putty (about 1/2 inch thick, costing $3–$5 per container) and press it around the underside of the flange lip. Reinsert the flange into the drain hole and tighten the locknut until you see the putty squeeze out evenly. Wipe away the excess putty.
If the metal flange is corroded or pitted, skip the putty and replace the entire strainer assembly (usually $5–$15) since a corroded flange won’t seal properly.
For small cracks or pinholes in pipes made of copper, PVC, PEX, or galvanized steel, epoxy putty is a quick fix. Start by draining the pipe and cleaning the damaged area thoroughly. Knead the two-part putty until it’s a uniform color, then press it firmly over the leak, applying about 1/2 inch thickness. Feather the edges outward to create a smooth, tapered seal. Allow the putty to cure fully – this can take anywhere from 30 minutes to several hours – before turning the water back on. Keep in mind, epoxy putty is best for small damage and works as a temporary solution for pressurized lines.
Self-fusing silicone tape is a handy option for emergency fixes on non-pressurized drain pipes. Wrap the tape several inches before the leak, overlapping each layer by about half its width. Stretch the tape slightly as you wrap, continuing past the damaged area to activate its self-fusing properties. This method is not suitable for pressurized supply lines but can hold until a permanent repair is made.
If the P-trap has visible cracks, holes, or corrosion, replacing it is the best solution. Chrome traps, in particular, are prone to internal corrosion that leads to leaks. Bring the old assembly to the hardware store to ensure you get the right pipe diameter and connection type. PVC P-traps (typically $5–$10) are a better choice than chrome, as they resist corrosion over time. When installing the new trap, ensure all washers are positioned with the tapered side facing the pipe connection. Hand-tighten the slip nuts first, then give each a quarter turn with pliers, following the earlier tightening advice.
"Hand-tighten all connections first, then go back and give each a quarter turn with pliers. That is it. Overtightening plastic slip-joint nuts cracks them." – Ryan Pietrzak, Licensed Plumber
| Component | Sign of Failure | Recommended Action |
|---|---|---|
| P-trap Pipe | Cracks, pinholes, corrosion | Replace entire trap |
| Slip-joint Nut | Stripped threads, visible cracks | Replace nut and washer |
| Washers/O-rings | Brittle, flattened, or cracked | Replace with new nylon/rubber washer |
| Basket Strainer | Pitting on metal flange | Replace entire strainer assembly |
Once you’ve completed your repair, the next step is to make sure it holds up. Before turning the water back on, dry all connections completely using a paper towel. This will help you quickly spot any signs of moisture if a leak occurs.
When you’re ready, open the shutoff valve slowly to allow the system to pressurize gradually. This gives you a chance to detect any leaks as they start. If you used PVC cement or epoxy putty, make sure to wait the full cure time – this could range from 15 minutes to several hours – before introducing water. As the pressure builds, carefully inspect all joints and connections for moisture, drips, or condensation. If you notice any signs of a leak, turn the water off immediately and revisit your repair.
"Never assume it is fixed until it passes a slow, careful test." – Gilbert Olivarez, Professional Plumber
Once you’re confident there are no leaks, proceed to test the repair under normal operating conditions.
To ensure the repair is solid, run the faucet at full pressure for several minutes, keeping a close eye on every connection. If your repair involves supply lines, test both hot and cold water, as temperature changes can sometimes cause leaks. For drain-side repairs – like P-traps or basket strainers – fill the sink completely, then release the stopper to let a large volume of water flow through the pipes.
Place a dry paper towel under the repaired area and check it at intervals: after 5 minutes, 30 minutes, and one hour. Even if everything appears dry at first, slow leaks can develop over time as the system adjusts to the pressure. To be extra cautious, check the paper towel again the following day to catch any lingering drips you might have missed.
"A paper towel under the repair is a simple way to spot slow drips." – Gilbert Olivarez, Professional Plumber
Fixing a leaky pipe under your sink is manageable as a DIY project when you follow the right steps. Most leaks stem from common issues like loose compression fittings, worn-out washers, or cracks in the P-trap connection. Start by shutting off the water supply immediately, use dry paper towels to pinpoint the exact source of the leak, and then apply the proper fix for the problem. This step-by-step approach ensures the leak is addressed efficiently.
"Identifying the exact source of the leak is the first step, and the repair is usually well within DIY territory once you identify the leak." – HandyMen NYC Editorial Team
Keep in mind that temporary fixes are just that – temporary. While epoxy putty and self-fusing silicone tape can provide a quick solution, permanent repairs require tightening fittings or replacing damaged components. For plastic fittings, hand-tighten first, then use pliers carefully to avoid cracking. If a supply line is leaking along its length, it’s best to replace the entire hose rather than attempting a patch.
Once the repair is complete, thorough testing is essential. Run water at full pressure, check all connections with a dry paper towel, and monitor the area for at least 24 hours to ensure no slow drips persist. This step is particularly important in multi-unit buildings, where even a small leak can cause damage to neighboring units and result in liability for repairs. By following these steps and advice from Gold Team Home, you can prevent further damage and confirm the durability of your repair over the next day.
When it comes to leaks under a sink, the issue could stem from either the drain or the supply line. Some typical culprits include:
To figure out where the leak is coming from, turn on the water and carefully watch. Check if the leak begins at the supply line connections or the drain connections – this will help you identify the problem area.
If the P-trap is cracked, corroded, or otherwise damaged, tightening the slip-joint nuts won’t solve the problem. In such cases, replacing the P-trap is the best solution to stop leaks effectively. Visible cracks or signs of corrosion are definite indicators that it’s time for a new P-trap to avoid ongoing issues.
If tightening the packing nut or replacing worn packing material doesn’t stop a leaky shutoff valve, it’s probably time to call a plumber. You’ll also want professional help if the valve is damaged, corroded, or if the problem involves the main water shutoff. Severe leaks or replacing the valve often require specialized tools and know-how, making it a task better left to an expert.