New! DIY Project Planner. Plan smarter, skip the spreadsheets. Start Your Free Trial Today →

Smart DIY & Home Improvement Tips
Smart DIY & Home Improvement Tips
Build shelves that actually fit your stuff — without hiring a pro.
Tired of stacked boxes and wasted space? This DIY closet shelf guide shows you how to build custom shelving that fits your layout, your storage needs, and your style — no fancy tools required.
You don’t need a full workshop to build custom closet shelves — just a handful of tools and supplies that help you measure accurately, cut cleanly, and install everything securely.
Tools
Materials
Just a heads up: Some of the links in this guide are affiliate links, which means we may earn a small commission if you buy through them (at no extra cost to you). We only recommend tools we trust — thanks for supporting Gold Team Home!
Use a tape measure to find the exact width and depth of your closet where the shelves will go. Measure at multiple heights — walls aren’t always perfectly straight. If there’s a slight variation, use the smallest measurement to ensure your shelves will fit. Write your measurements down before moving on.
Use a stud finder to locate wall studs on both sides of the closet where the shelf supports will attach. Mark each stud lightly with pencil. Most studs are 16 inches apart. Move slowly and follow the stud finder’s instructions — the display should light up or beep when you’re over a stud. Confirm by driving in a small nail if you’re unsure.
Using your measurements, mark and cut your shelf boards to length. A circular saw or miter saw works best. If you’re cutting by hand, use a clamp or saw guide to keep your line straight. Always double-check your measurements before cutting — the classic “measure twice, cut once” rule applies. Wear safety glasses and keep hands clear of the blade.
Cut 1×2 or 1×3 boards to create wall cleats (supports). These will run along the back and sides of the closet to hold your shelf. Each cleat should match the width or depth of your shelf. Lightly sand any rough edges. Then, hold each cleat up to its spot and use a level to mark straight lines on the wall as guides.
Align each cleat to your level lines and pre-drill screw holes where they’ll hit the studs. Use 2.5″ wood screws to secure the cleats firmly into the studs. Pre-drilling prevents splitting and helps the screw drive in cleanly. Make sure the cleats feel solid — they’ll be bearing all the weight of the shelf.
Place each shelf board on top of the cleats and check that it’s sitting level and flush to the walls. You can leave the shelf resting on the cleats for easy removal, or secure it with a few short wood screws from above. Don’t overtighten — you want the shelf to sit flat and clean.
Browse our full library of beginner-friendly guides — from quick upgrades to full weekend projects, all designed to help you build confidence and make your home your own.
✅ Pro Tips
Use Painter’s Tape to Mark Cuts: If you’re using a circular saw, lay painter’s tape over your cut line to reduce splintering on the wood’s surface.
Prime and Paint Before Installing: If you plan to paint or stain your shelves, it’s way easier to do this before installing them in the closet.
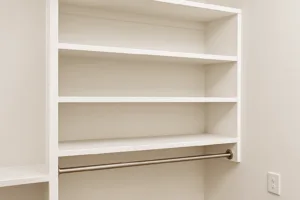
Go Wall-to-Wall if You Can: Custom shelves that span the full width give you more storage and a cleaner, built-in look.
Label Each Cut Board: Before installation, label the boards with painter’s tape (e.g., “Left cleat,” “Top shelf”) to stay organized and speed up install time.
Add a Front Trim Board: Want a more polished, finished look? Nail a 1×2 board to the front edge of each shelf. It hides the plywood edge and makes shelves look pro-built.
❌ Common Mistakes to Avoid
Don’t Skip the Stud Finder: Shelves resting only on drywall won’t hold up over time. Hitting studs is a must for long-term strength and safety.
Uneven Cleats = Sagging Shelves: If your cleats aren’t level, your shelf will lean or warp. Always use a level when installing — and double-check before driving screws.
Wrong Screws for the Job: Don’t use drywall screws or nails. Stick with quality wood screws long enough to anchor deep into studs.
Assuming Walls Are Square: Most closets aren’t perfectly square. Always measure each shelf location separately — and don’t assume the top and bottom will be the same.
Overloading the Shelves: Even solid shelves have limits. Keep heavy bins or items near the ends (where the shelf is best supported), and don’t overload with more than the shelf is built for.
Upgrading your gear makes every project easier (and way more fun). We’ve rounded up the best drills, levels, saws, and more — all tested for real-world DIY use.
Join our free DIY email list and get weekly tips, tools, and guides to tackle your next home project like a pro. No spam, just real help.