New! DIY Project Planner. Plan smarter, skip the spreadsheets. Start Your Free Trial Today →

Smart DIY & Home Improvement Tips
Smart DIY & Home Improvement Tips
Stains, grime, and algae don’t stand a chance — here’s how to deep clean your driveway, patio, or sidewalk the right way.
Tools
Materials
Just a heads up: Some of the links in this guide are affiliate links, which means we may earn a small commission if you buy through them (at no extra cost to you). We only recommend tools we trust — thanks for supporting Gold Team Home!
Start by removing everything from the surface — furniture, planters, grills, etc.
Pro Tip: Avoid rinsing first if there’s oil or grease — dry absorption works better than smearing with water.
Pick a cleaner based on the type of stain:
Mix your cleaner in a bucket or pump sprayer according to the label.
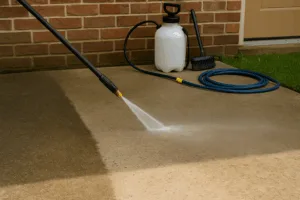
Lightly soak the area using a hose and nozzle. This helps loosen surface dirt and prevents the cleaner from soaking in too fast.
Spray or pour your cleaning mix across the concrete evenly.
Beginner Tip: Work in small sections if it’s hot outside — cleaners evaporate fast on warm concrete.
Use a stiff scrub broom or broom to agitate the surface and work the cleaner into textured areas and stains.
Use a hose with strong pressure to rinse away all cleaner and residue.
🌱 Eco Tip: If you used bleach, rinse extra well — some plants are sensitive to runoff.
If the surface still looks dirty or stained, use a pressure washer as a final step.
Warning: Don’t use high PSI settings on older or decorative concrete — it can pit the surface.
Let the concrete dry completely before moving furniture or walking on it, especially if you used strong cleaners.
Dry time depends on heat and sun exposure — usually 30 minutes to a few hours.
Browse our full library of beginner-friendly guides — from quick upgrades to full weekend projects, all designed to help you build confidence and make your home your own.
✅ Pro Tips
✅ Test your cleaner on a small spot first
Always do a test patch in a corner or hidden edge to make sure the cleaner doesn’t stain or discolor your concrete.✅ Keep the surface damp while cleaner is sitting
If the cleaner dries out mid-process, it won’t work as effectively — and it may leave streaks behind.✅ Sweep again after drying
Once the concrete dries, sweep off any remaining residue — especially if you used baking soda or powder-based products.✅ Use the right spray tip if pressure washing
Stick to a 25° or 40° spray nozzle. It’s enough to clean without damaging the surface.
❌ Common Mistakes to Avoid
❌ Using bleach without rinsing thoroughly
Leftover bleach can damage grass, plants, and nearby decking — always rinse well and neutralize runoff if needed.❌ Pressure washing too close or with the wrong tip
Too much pressure can etch concrete, especially older slabs or decorative finishes.❌ Skipping the pre-wet stage
If you apply cleaner to dry concrete, it soaks in too quickly and can stain or reduce effectiveness.❌ Letting chemicals dry on the surface
If your cleaner dries out before you rinse, it can cause streaks, haze, or even chemical burns on the concrete.
Upgrading your gear makes every project easier (and way more fun). We’ve rounded up the best drills, levels, saws, and more — all tested for real-world DIY use.
Join our free DIY email list and get weekly tips, tools, and guides to tackle your next home project like a pro. No spam, just real help.