New! DIY Project Planner. Plan smarter, skip the spreadsheets. Start Your Free Trial Today →

Smart DIY & Home Improvement Tips
Smart DIY & Home Improvement Tips
A clear, practical guide to home electrical circuits: wiring, breakers, grounding, 120/240V differences, common faults and basic troubleshooting.
Home electrical circuits power your home by creating a closed loop that delivers electricity from the main service panel to devices and back. Each circuit includes three wires: hot (black/red), neutral (white), and ground (bare/green). Breakers in the service panel protect against overloads, short circuits, and electrical hazards. Here’s what you need to know:
Understanding these basics can help you maintain safety, troubleshoot issues, and decide when to call a professional.
Your home’s electrical system is like a well-orchestrated symphony, with the service panel, wiring, and safety systems working together to keep everything running smoothly.
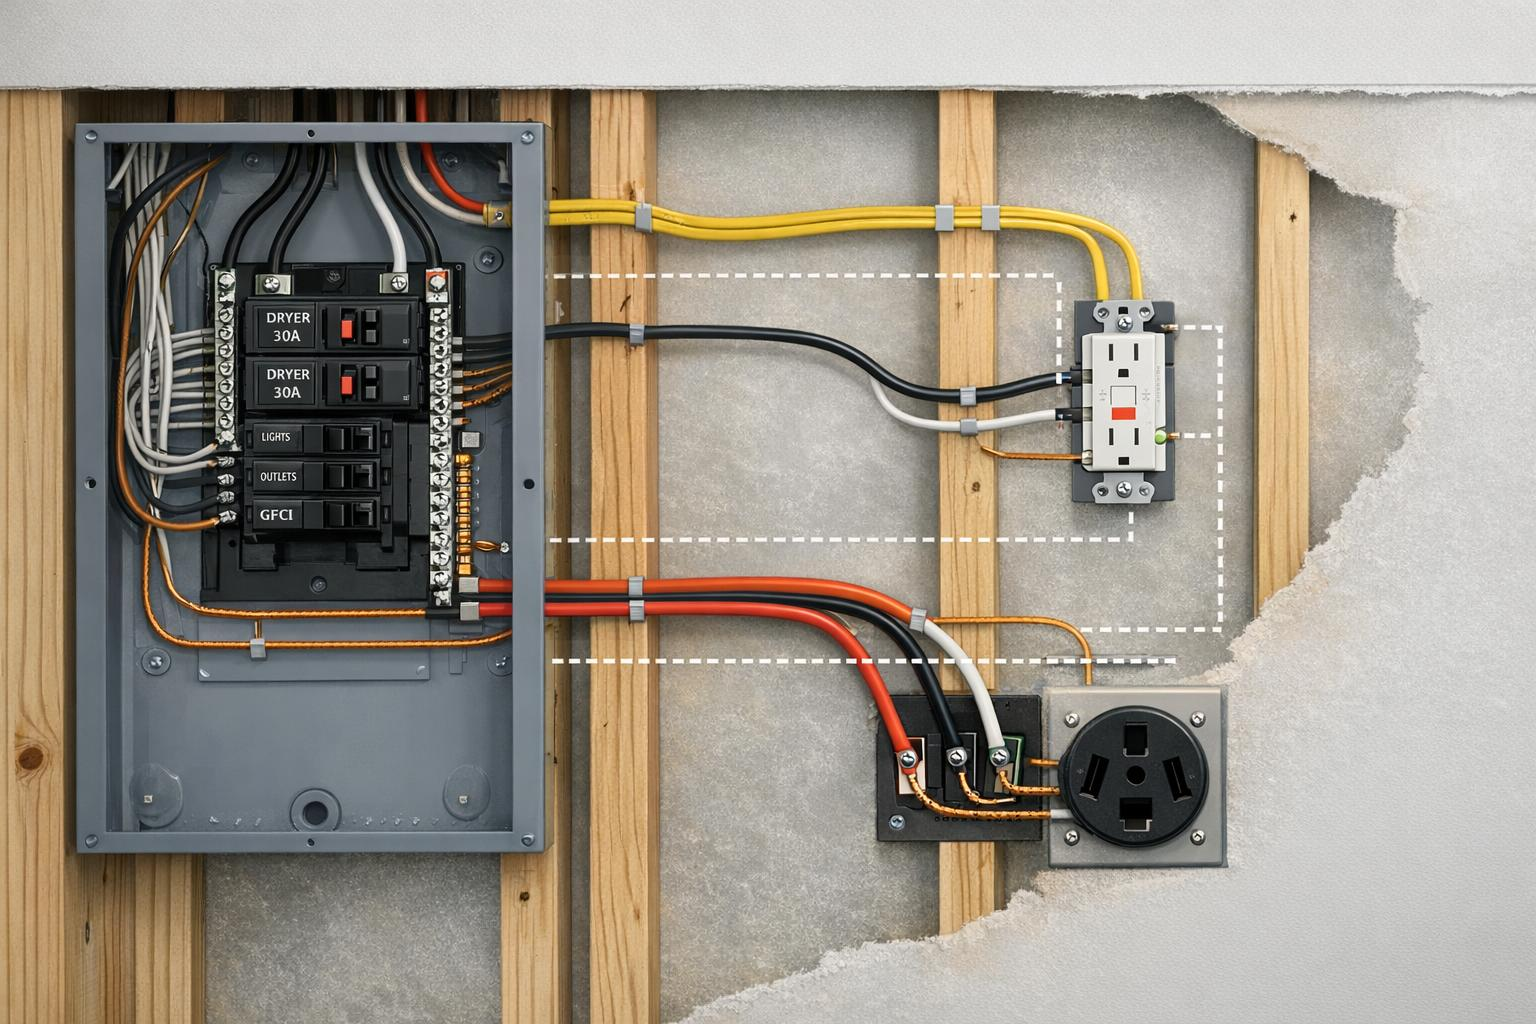
The service panel, also known as the breaker box or load center, is the central hub of your home’s electrical system. It takes in power from the utility company and distributes it through smaller branch circuits to different parts of your home. Most modern homes are equipped with 100, 150, or 200-amp service panels, though older homes may still rely on outdated 60-amp systems.
Circuit breakers are the unsung heroes of this setup. They act as switches that control the flow of power and provide critical protection in three ways: they trip when circuits are overloaded (too many devices drawing power), they shut off instantly during short circuits (when a hot wire touches a neutral or ground wire), and they work with the grounding system to prevent electric shocks. For standard 120-volt circuits, breakers are usually rated at 15 or 20 amps, while 240-volt circuits for heavy-duty appliances like dryers use double-pole breakers rated at 30 amps or higher.
As Mr. Electric puts it:
“The beauty of breakers is that they not only control power but also protect your electrical system from overloads and electrical hazards such as shocks and fires.”
New safety measures, like the National Electrical Code‘s 2023 requirement for an exterior emergency disconnect switch, allow first responders to cut power to your home in emergencies. If you’re considering electrical upgrades, keep in mind that replacing a main breaker box typically costs around $1,475, while upgrading to a 200-amp panel can go up to $2,500.
Electricity flows through your home via cables containing three essential wires: hot, neutral, and ground. Each branch circuit starts at the service panel and powers specific rooms or appliances. The wire gauge is critical for safety – 14 AWG wire should be paired with a breaker no larger than 15 amps, while 12 AWG wire requires a maximum of 20 amps.
Outlets, or receptacles, are the access points where you plug in devices. Modern outlets are designed with safety in mind, featuring a grounding hole and polarized slots. Switches, on the other hand, act as control points, interrupting the flow of electricity along the hot wire to turn lights or appliances on and off.
Proper wire sizing and thoughtful circuit distribution are essential to prevent overheating and reduce fire risks. These components work in harmony with grounding systems to ensure your home’s electrical network operates safely and reliably.
Grounding is a critical safety feature that provides a low-resistance path for stray electricity to return to the service panel if something goes wrong, like a wire coming loose or insulation failing. Without grounding, stray current could pass through you instead of safely dissipating into the earth. The grounding system connects your home’s electrical setup to the earth using approved electrodes.
As Dean Austin, NFPA Senior Electrical Specialist, explains:
“Failure to establish an effective ground-fault current path through proper grounding may prevent overcurrent protective devices from working properly and therefore not effectively clearing a ground-fault, which could result in a shock, electrocution, or arc flash incident.”
Modern safety devices like Ground Fault Circuit Interrupters (GFCIs) are designed to cut power when they detect even small leaks of electricity (4 to 6 milliamps). This is crucial, as it only takes a few milliamps to cause fatal harm. You’ll typically find GFCIs in areas where water and electricity are likely to mix, such as bathrooms, kitchens, garages, and outdoor spaces. Additionally, Arc Fault Circuit Interrupters (AFCIs) are becoming more common in bedrooms and living areas. These devices detect dangerous electrical arcing that standard breakers might miss, adding another layer of protection.
Together, these grounding and safety systems create a robust defense against electrical hazards, ensuring your home remains both functional and secure.
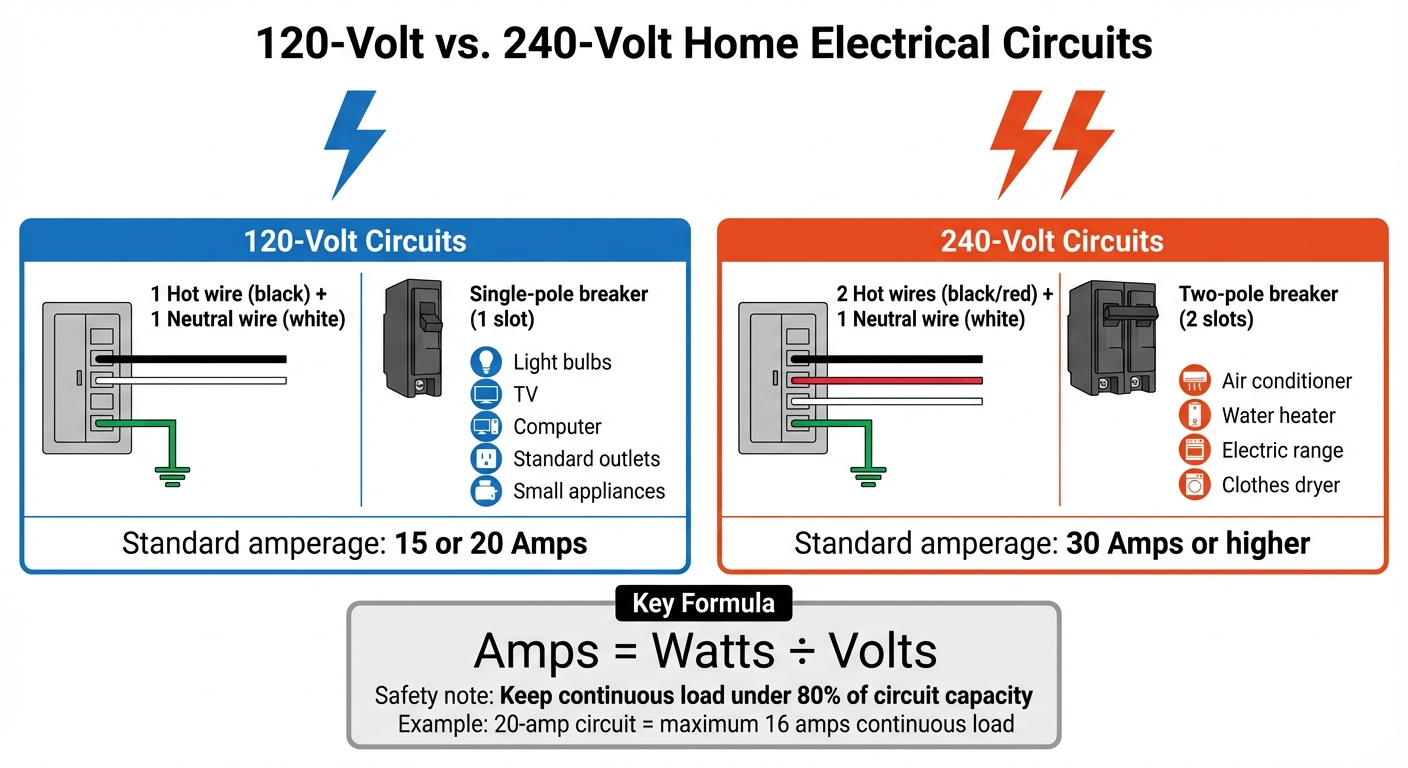
120-Volt vs 240-Volt Home Electrical Circuits Comparison
Electricity starts its journey at power plants as high-voltage AC (60 Hz). From there, it travels along transmission lines over long distances until it reaches your neighborhood. At this point, a transformer – either mounted on a utility pole or placed on the ground – reduces the voltage to 120/240 volts, making it suitable for residential use.
When the power reaches your home, it enters through either overhead wires (called a service drop) or an underground conduit. Both systems use a three-wire setup: two hot wires and one neutral. If you have overhead service, you might notice a weather head, a fitting designed to keep rain out of your electrical system and protect your home’s power intake.
Modern homes are often equipped with smart meters, which send usage data wirelessly to the utility company, removing the need for manual meter readings. Additionally, homes built after the 2023 National Electrical Code update may include an exterior emergency disconnect switch. This feature allows first responders to safely cut power to the home without needing to go inside.
John Williamson, a Master Electrician, highlights the importance of the grid’s stability:
“The regional power grid operators work tirelessly and silently around the clock to make sure that the voltage and 60-Hz frequency of the grid is stable and consistent.”
Once the power enters your home, it flows into the main service panel, which is usually located in a basement, garage, or utility room. Here, the service-entrance wires connect to the main circuit breaker and hot bus bars. From this point, individual circuit breakers distribute electricity to various circuits throughout your home. This setup ensures a reliable and organized flow of power to meet your household’s needs.
Homes rely on two voltage levels to power different types of devices. Standard 120-volt circuits are used for everyday items like lights, TVs, computers, and most outlets. These circuits consist of one hot wire (typically black) and one neutral wire (white) and are controlled by single-pole breakers in the service panel.
For larger appliances, like air conditioners, electric water heaters, ranges, and clothes dryers, 240-volt circuits are required. These circuits use two hot wires and a neutral and are connected via two-pole breakers, which take up two slots in the service panel. You can usually spot these breakers by their tied handles.
The voltage difference comes from how the three-wire service in your home is configured. Measuring between the neutral and one of the hot wires gives you 120 volts, while measuring between the two hot wires provides 240 volts.
| Feature | 120-Volt Circuits | 240-Volt Circuits |
|---|---|---|
| Wiring | 1 Hot + 1 Neutral | 2 Hots + 1 Neutral |
| Breaker Type | Single-pole (1 slot) | Two-pole (2 slots) |
| Common Uses | Lights, outlets, small appliances | Air conditioners, water heaters, ranges, dryers |
| Standard Amperage | 15 or 20 Amps | 30 Amps or higher |
When installing new appliances, you can calculate the required circuit size using the formula: Amps = Watts / Volts. To ensure safety, avoid loading a circuit beyond 80% of its maximum capacity. For example, a 20-amp circuit should only handle a continuous load of 16 amps to reduce the risk of overheating and fire hazards.
Understanding how electricity flows through your home is just the start. Knowing how different wiring configurations affect performance and safety is equally important.
A series circuit allows electricity to flow along a single path, meaning the same current passes through every component. However, if there’s a break anywhere in the circuit, the entire flow of power stops.
Sidney Soclof, author of HowStuffWorks, provides a relatable example:
“An example of a series circuit is a string of Christmas lights. If any one of the bulbs is missing or burned out, no current will flow and none of the lights will go on.”
Because of this flaw, series circuits are rarely used in residential wiring. One exception is in safety devices. For instance, the wires from your electric meter connect in series to the Main Circuit Breaker (MCB). This setup ensures the breaker can cut power to your entire home during an emergency. Some older decorative light strings also use series wiring, though most modern versions have shifted to parallel configurations.
Given these limitations, homes today rely on a more practical approach.
To address the shortcomings of series circuits, modern residential wiring exclusively uses parallel circuits. This configuration allows electricity to flow along multiple independent paths. Each outlet, light fixture, or appliance is connected directly to the power source, ensuring it receives the full voltage (120V or 240V), regardless of the status of other devices.
The biggest advantage? If one device fails or is turned off, the others remain powered. A failure in one branch doesn’t affect the rest of the system.
Don Vandervort, founder of HomeTips, explains the difference:
“Series wiring routes the hot wire through several devices and then joins the neutral wire… this type of wiring is rarely used because it functions like old-style Christmas lights – when one light burned out, none would illuminate.”
Want to check if your home uses parallel wiring? Try the “bulb test”: remove a bulb or unplug a device. If the rest of the lights or appliances on that circuit stay on, the wiring is parallel. Another method is to map your circuits by switching off breakers one at a time. This helps identify which outlets and fixtures are on the same circuit and can prevent overloading any single branch.
This parallel setup doesn’t just improve reliability – it also makes troubleshooting easier. Problems in one branch won’t bring down the entire system, keeping your home running smoothly.
When it comes to maintaining electrical safety and performance in your home, knowing how to troubleshoot common circuit issues is essential. Even when circuits are properly wired and compliant with electrical codes, problems can still pop up, potentially impacting safety and functionality.
A circuit overload happens when the electrical demand exceeds the circuit’s safe capacity. From 2015 to 2019, electrical distribution system fires resulted in an estimated 51 deaths, 140 injuries, and $1.3 billion in property damage.
Look out for these warning signs of an overload: tripped breakers, dimming lights, warm outlets, buzzing noises, burning smells, or reduced performance in tools and appliances.
To calculate your circuit’s load, use the formula: Watts = Volts × Amps. For example, a 15-amp, 120-volt circuit can handle up to 1,800 watts, but it’s safer to keep usage under 1,440 watts (80% of the maximum load). Timothy Thiele, an IBEW Local #176 Union Electrician, advises:
“The safest strategy is to manage your electricity usage to prevent overloads in the first place.”
To fix an overload, start by mapping your circuits. Turn off breakers one by one to identify which outlets and lights they control. Add up the wattage of devices on each circuit and redistribute high-energy appliances like space heaters or toasters to less-used circuits. Switching incandescent bulbs to LEDs and avoiding daisy-chained extension cords can also help. For larger appliances or tools, you might need a dedicated 20-amp circuit installed.
Once the overload is addressed, you can safely reset any tripped breakers.
A tripped breaker is easy to spot – it usually has its handle stuck in the middle position. Before working on your electrical panel, make sure your hands and feet are dry and wear safety glasses for protection. Stand to the side and face away from the panel when resetting breakers.
Here’s how to reset a breaker safely:
For instance, plugging a 1,200-watt microwave (10 amps) and a 1,700-watt air fryer (14 amps) into the same 20-amp circuit creates a combined load of 24 amps, which will trip the breaker. If the breaker trips again with nothing connected or you notice a burning smell, call an electrician immediately.
If your troubleshooting reveals issues like flickering lights or dead outlets, here’s what to do next.
Flickering lights often indicate a loose wire connection, which can lead to overheating. If only one light flickers, check the bulb and fixture wiring. If multiple lights flicker, the problem could be a loose neutral wire in your main panel.
Dead outlets can be trickier. Since most outlets are wired in series, a bad connection in one outlet can knock out others downstream. Rusty Wise, the owner of Mister Sparky of Cherryville, NC, explains:
“Most home outlets are connected together just like a string of holiday lights, so if you have a bad connection in one all the others down the line will not work.”
Before calling a professional, check for a tripped GFCI outlet. These outlets, often found in kitchens or bathrooms, have “TEST” and “RESET” buttons and can protect several outlets on the same circuit. If resetting the GFCI doesn’t solve the issue, turn off the main breaker and inspect the dead outlet for signs of damage, like charred plastic or loose wires. Avoid using push-in connections, as they can loosen over time. Instead, secure wires by wrapping them around terminal screws for a more reliable connection.
Understanding how electricity moves through your home is key to maintaining a safe and efficient electrical system. Power flows from the service panel, travels along hot wires to devices, and returns via neutral wires. The service panel manages power distribution through branch circuits, while circuit breakers step in to cut power when loads exceed safe levels. Grounding plays a vital role, offering a safety path for stray electricity, and devices like GFCIs and AFCIs provide added protection against shocks and potential fires.
It’s also important to distinguish between 120-volt circuits, typically used for outlets and lighting, and 240-volt circuits, which power heavy-duty appliances. Modern energy demands can put a strain on older wiring systems, so keeping track of your home’s circuits and testing safety devices regularly can help prevent potential issues.
Signs like breaker trips or flickering lights often indicate underlying problems. Calculating your circuit’s load can help you avoid overloads, while knowing how to safely reset breakers or locate a tripped GFCI can save both time and money. Always turn off power before working on any electrical components, and if you notice signs of overheating, don’t hesitate to call a professional.
With these fundamentals in mind, you’re ready to approach your next DIY electrical project with greater confidence.
For homeowners looking to take on electrical projects, Gold Team Home (https://goldteamhome.com) provides clear, step-by-step tutorials grounded in real-world construction experience. Whether you’re installing outlets, upgrading lighting, or planning a new circuit, their guidance helps you avoid common mistakes and achieve professional-grade results.
If you’re new to electrical work, low-voltage projects like installing doorbells or landscape lighting are a great place to start. These tasks involve transformers that reduce 120-volt power to a safer 12 volts, making them ideal for beginners. As your skills grow, you’ll be better prepared to tackle more complex projects and recognize when it’s time to bring in a licensed electrician for major upgrades or repairs.
If your home’s electrical panel is aging, damaged, or showing signs of wear, it might be time to consider an upgrade. Older panels, especially those rated at 60 amps or less, often can’t handle the energy demands of today’s households. This can lead to safety concerns and inefficiencies.
Signs like frequent breaker trips, flickering lights, or an overloaded system are strong indicators that your panel may be struggling. This becomes even more critical if you’re planning to add energy-intensive upgrades like new appliances, electric vehicle chargers, or solar panels. Reaching out to a licensed electrician is the best way to assess your panel’s condition. They can guide you on whether an upgrade is necessary and ensure your system is safe and compliant with current codes.
If your home’s electrical system is struggling, you might notice a few telltale signs: lights that flicker or dim, circuit breakers that trip often, outlets or switches that feel warm or look discolored, or even burning smells or buzzing sounds near outlets or wiring. Another red flag? Sparks when plugging in devices or appliances.
Should you encounter any of these warning signs, it’s crucial to act quickly. Start by unplugging some devices from the affected circuit to lighten the load, and then get in touch with a licensed electrician to check things out. Taking swift action can help protect your home from fire risks and prevent costly damage to your electrical system.
To reset a tripped circuit breaker safely, first locate your home’s electrical panel. Look for the breaker that’s shifted to the middle or OFF position. Before proceeding, ensure your hands are completely dry, and you’re standing on a dry surface to avoid any risk of electrical shock.
When ready, push the breaker firmly to the OFF position and then back to ON. This should restore power to the affected area. After resetting, check to make sure everything is working as expected. If the breaker trips again right away or shortly after, it might be a sign of an overload or a wiring issue. In such cases, it’s wise to call a licensed electrician to investigate and address the problem to keep your electrical system safe.