
DIY Skills Every Beginner Should Know (Start Here First)
Welcome to your jumpstart into home projects. If you’ve never swung a hammer or used a power drill, don’t worry—you’re in the right place. This guide breaks down the essential DIY skills for beginners so you can stop second-guessing yourself and actually do the thing.
You don’t need a workshop. You don’t need fancy tools. You just need a starting point—and that’s what you’ll find here. We’ll walk through the must-know basics that unlock dozens of common home projects, all explained clearly and without the fluff.
Just a heads up: Some of the links in this guide are affiliate links, which means we may earn a small commission if you buy through them (at no extra cost to you). We only recommend tools we trust — thanks for supporting Gold Team Home!
Starter Tools Every DIY Beginner Should Own
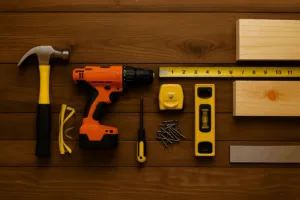
You don’t need a full workshop to start doing your own home repairs. With just a few well-chosen tools, you’ll be ready to handle 90% of basic projects — from hanging shelves to fixing loose knobs or installing new hardware.
Here are the tools every beginner should have on hand:
Cordless Drill + Bit Set
The most useful tool in any beginner’s kit. A cordless drill lets you drive screws, drill holes, and install wall anchors with ease. Look for a 12V or 18V model, or 20V if you’re choosing DEWALT, along with a basic bit set to handle most common tasks.
See beginner drill picks →
See our go-to drill bit set →
Tape Measure
You’ll use this constantly — measuring walls, marking drill points, spacing decor. A 25-foot retractable tape with a locking feature is ideal for everyday projects.
Get a reliable tape measure →
Stud Finder
Helps you safely mount items to your wall by finding studs behind drywall. This is a must if you’re installing anything heavy, like shelves or a TV. Even the basic models work well.
Find a good stud finder →
Level
Even if you’re just hanging pictures, a small bubble level helps you keep things straight. Start with a 9″ or 24″ model — compact and easy to use.
Check out top-rated levels →
Hammer
The most classic tool there is. Useful for everything from tapping in nails to pulling them out. A standard 16oz claw hammer is perfect for beginners.
See beginner hammers →
Utility Knife
Cut boxes, trim edges, score drywall patches — a utility knife does more than you’d think. Look for a retractable or folding version with extra blades.
Shop beginner utility knives →
Safety Glasses + Gloves
Protect your eyes and hands when drilling, hammering, or sanding. Lightweight safety gear is cheap, easy to store, and often overlooked — but always worth it.
See our safety glasses pick →
Best gloves for DIY work →
Screwdriver Set
Sometimes a drill is overkill. A set of manual screwdrivers (flat-head and Phillips) is essential for simple adjustments or tight spots.
View beginner screwdriver sets →
Start Here, Add As You Go
This isn’t about owning every tool — it’s about starting with the right ones. Once you’ve got these, you’ll be ready to follow most of the DIY guides here on Gold Team Home.
Foundational DIY Skills Every Beginner Should Learn
These are the core skills that unlock dozens of common home projects — and they’re all easier than you think. Each one is quick to learn, tough to mess up, and gives you the kind of confidence that makes the next project feel even easier.
1. How to Use a Drill Without Stripping Screws
Most beginners just “pull the trigger” and hope. But with a few simple tips, your drill becomes your most reliable tool.
What to Know:
- Start slow and steady — speed comes after the screw starts gripping.
- Match your screw bit to the screw head (a loose bit = stripped screw).
- Let the drill do the work — no need to force it.
- Use the clutch setting to prevent overtightening or damaging material.
Try it on: Hanging curtain rods, assembling furniture, mounting brackets
2. How to Measure and Mark Accurately
Bad measurements lead to bad results — crooked shelves, misaligned holes, wasted materials. The fix? A repeatable process.
What to Know:
- Use a locking tape measure to hold your place.
- Mark measurements clearly with a pencil and double-check before cutting.
- For walls, painter’s tape can act as a temporary guide or measuring line.
- Always measure twice — especially before you drill or cut.
Try it on: Hanging wall art, trimming shelf brackets, marking anchor points
3. How to Find a Stud in the Wall
If you’re hanging anything heavy (like shelves or a TV), finding a stud is critical.
What to Know:
- Use a basic electronic stud finder and scan slowly.
- Mark both sides of the stud for accuracy.
- Most studs are spaced 16 inches apart — verify before you drill.
- If there’s no stud where you need it, use wall anchors instead.
Try it on: Installing shelves, curtain rods, heavy mirrors
4. How to Patch Small Holes in Drywall
Nail holes, wall dings, and dents are a rite of passage — but they’re easy to fix.
What to Know:
- Use a lightweight spackling compound and a putty knife.
- Apply in thin layers and let it dry between coats.
- Sand lightly with a sanding block until smooth.
- Touch up with leftover wall paint or color-matched samples.
Try it on: Old nail holes, wall scuffs, door knob dents
5. How to Caulk Neatly (And Not Make a Mess)
Good caulking can make a space look professionally finished — especially around tubs, trim, or windows.
What to Know:
- Use painter’s tape to mark off a straight edge.
- Cut the caulk tube at a 45° angle and start with light pressure.
- Smooth with a wet finger or caulk tool, then peel the tape immediately.
- Clean up extra with a damp rag while it’s still wet.
Try it on: Bathroom corners, window trim, kitchen backsplashes
6. How to Drill a Pilot Hole
This one skill can save you from split wood, stripped screws, or lopsided shelves.
What to Know:
- Pilot holes let the screw grip without splitting the material.
- Use a bit slightly smaller than the screw’s core diameter.
- Drill straight and to the right depth — painter’s tape on the bit helps.
- Always use pilot holes when drilling into hardwood or trim.
Try it on: Installing curtain rods, floating shelves, wood trim
7. How to Sand and Smooth Surfaces
Whether you’re painting furniture or touching up a patch, sanding is what makes it clean and pro-looking.
What to Know:
- Start with a medium-grit (120–150) and finish with a fine (220+).
- Always sand with the grain of the wood.
- Use light pressure — don’t dig into the surface.
- Wipe with a damp cloth before painting or staining.
Try it on: Furniture flips, drywall patches, painted trim
Explore DIY Projects
You don’t need to know everything to get started — just enough to take the next step. These DIY walkthroughs are designed with first-timers in mind, and they’ll help you build skills project by project.
Try one of these next:
Pro Tips
✅ Pro Tips
✅ Practice before the real thing
Use scrap wood or an old wall to practice drilling, sanding, or patching. The best way to learn is to mess up where it doesn’t matter.✅ Use painter’s tape for everything
It’s more than a painting tool. Use it to mark drill points, keep lines straight, or protect edges while sanding. It’s a beginner’s secret weapon.✅ Go slow, then speed up
Whether you’re cutting, drilling, or caulking — control beats speed. Let the tool do the work and build your pace over time.✅ Light makes everything easier
Bad lighting leads to bad measurements, missed spots, and crooked installs. Use a clamp light, headlamp, or even your phone flashlight to clearly see what you’re doing.✅ Take photos before and after
Not just for memories — photos help you remember what you did, how things looked before, and can even guide future projects.
❌ Common Mistakes to Avoid
❌ Skipping prep work
Not taping, measuring, or cleaning properly leads to most beginner mess-ups. Don’t rush to the fun part.❌ Using the wrong tool
Using a drill bit that’s too big, the wrong screw head, or no pilot hole at all? All avoidable if you slow down and check the details.❌ Overthinking the job
Many beginners stall out because they think they need to know everything. Just get the right tools, follow a trusted guide, and take it one step at a time.❌ Not reading the packaging
From wall anchors to caulk to spackle, the product instructions often tell you exactly how to use them. Take 30 seconds and read them first.❌ Forgetting to protect the space
Always lay down a drop cloth or tarp if you’re sanding, painting, or drilling. It keeps your floors and furniture safe from rookie mistakes.
Need Better Tools?
Upgrading your gear makes every project easier (and way more fun). We’ve rounded up the best drills, levels, saws, and more — all tested for real-world DIY use.
Level Up Your DIY Skills – One Weekend at a Time
Join our free DIY email list and get weekly tips, tools, and guides to tackle your next home project like a pro. No spam, just real help.